How to use Compute Server
Describes user operations and procedures, such as reserving compute servers
This section describes the operation procedures for compute servers by users.
Operations include reserving, using, and terminating compute servers, as well as changing reservation periods, extending usage time, and checking usage status.
Note that these operations can also be performed by administrators.
1. Operation Target
Users and administrators can perform operations such as reserving compute servers for servers that can be used by the user group to which they belong.
2. Using Compute Server
Cloud Bouquet allows compute servers to be used within a pre-defined region.
This section describes the steps involved in reserving, using, and terminating compute servers.
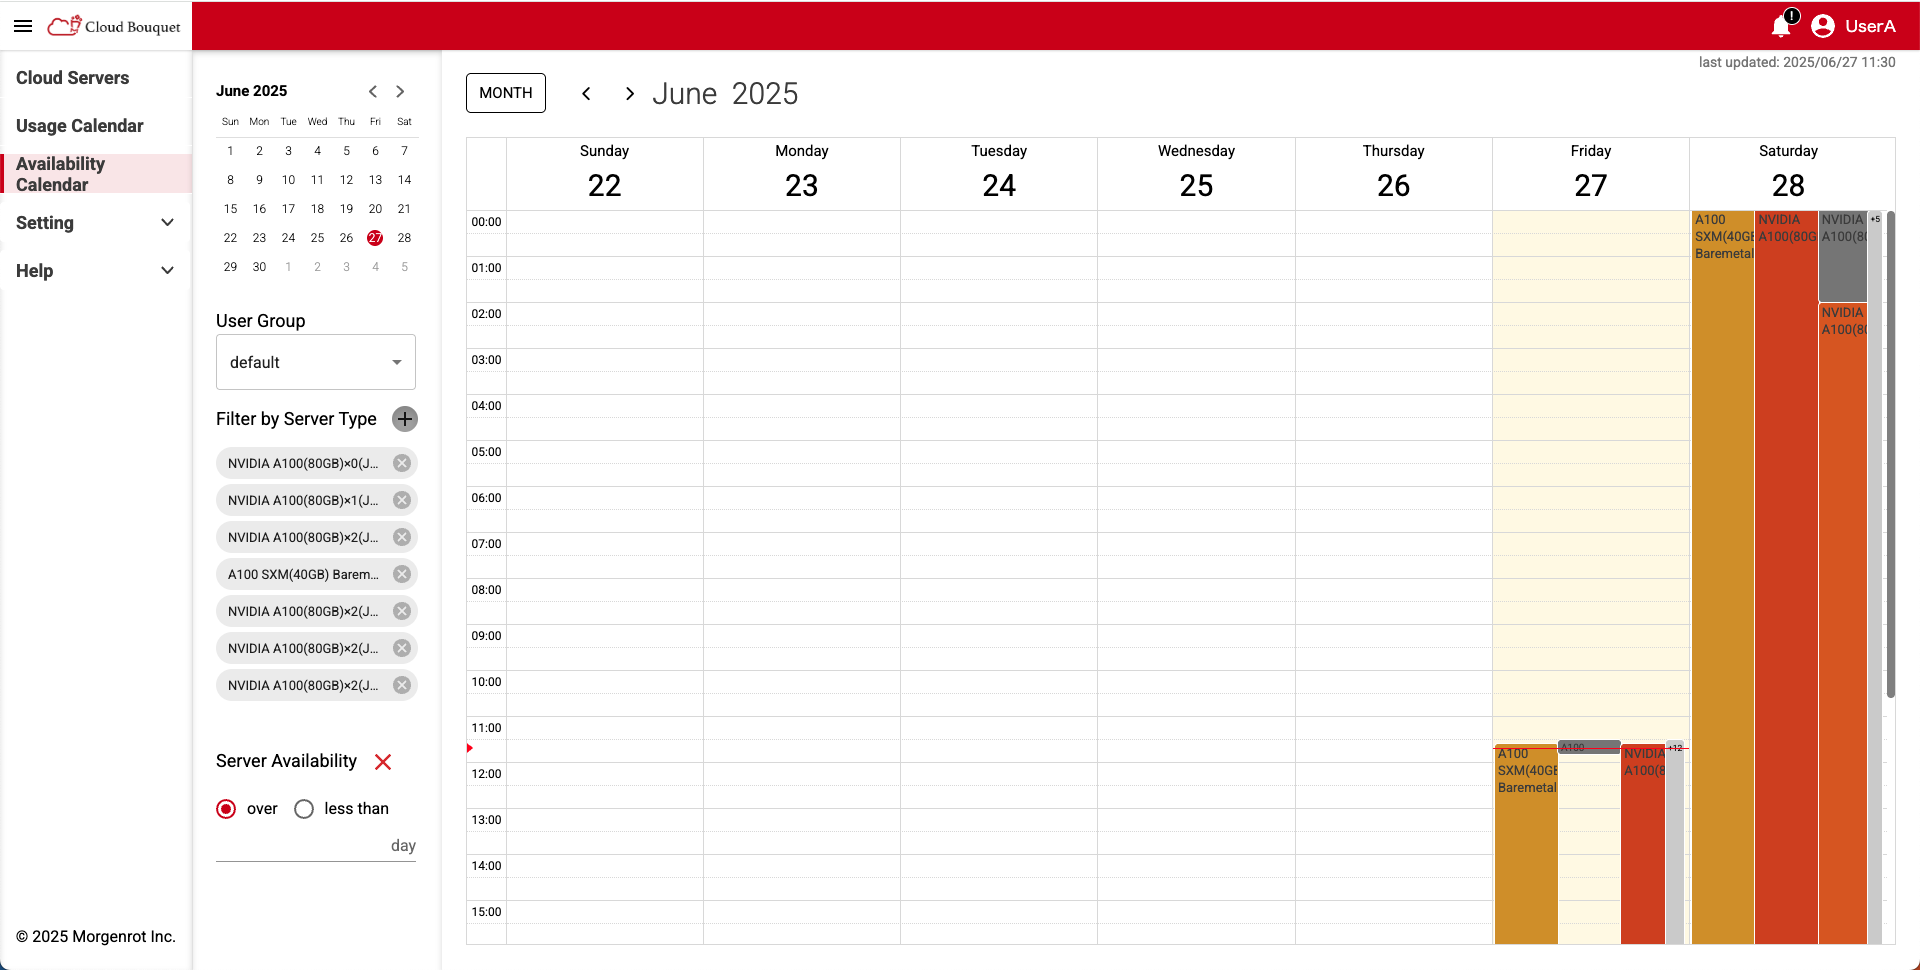
2.1. Confirming Compute Server Availability
Before reserving a compute server, confirm in advance if the specifications of the desired compute server are available for the desired period.
- To check availability, open the 【Availability Calendar】 screen from the left menu.
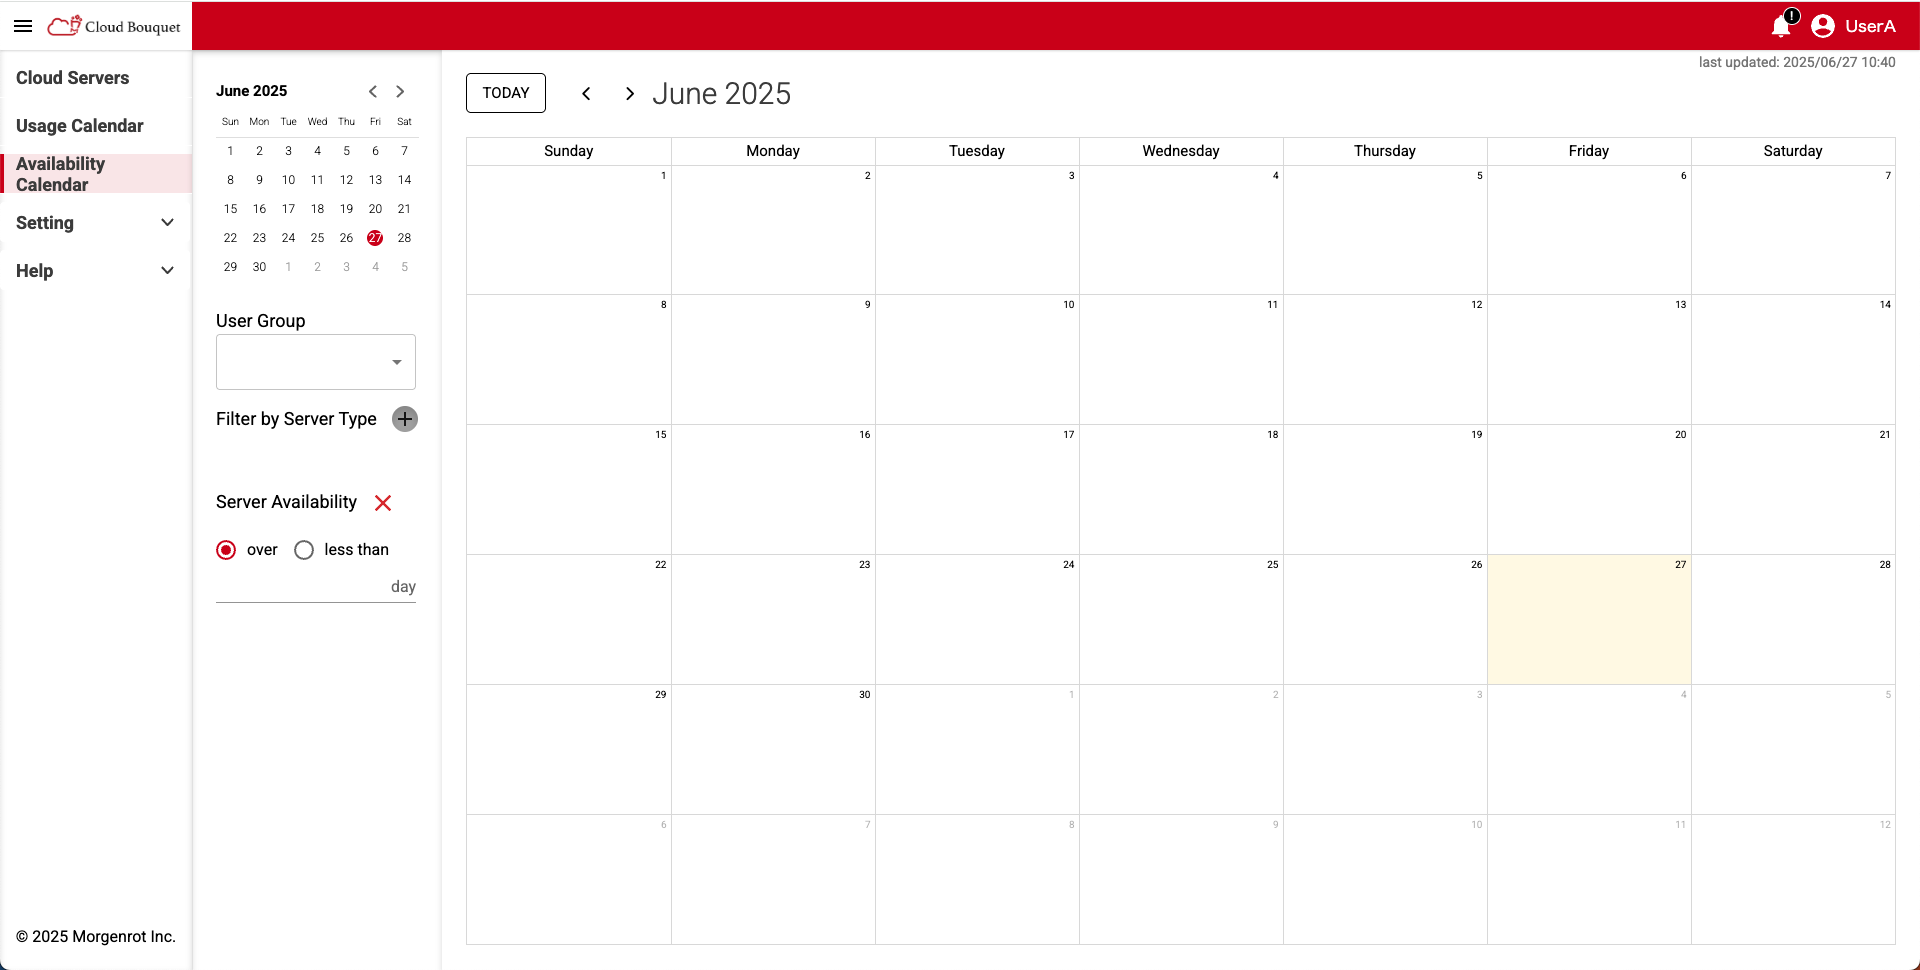
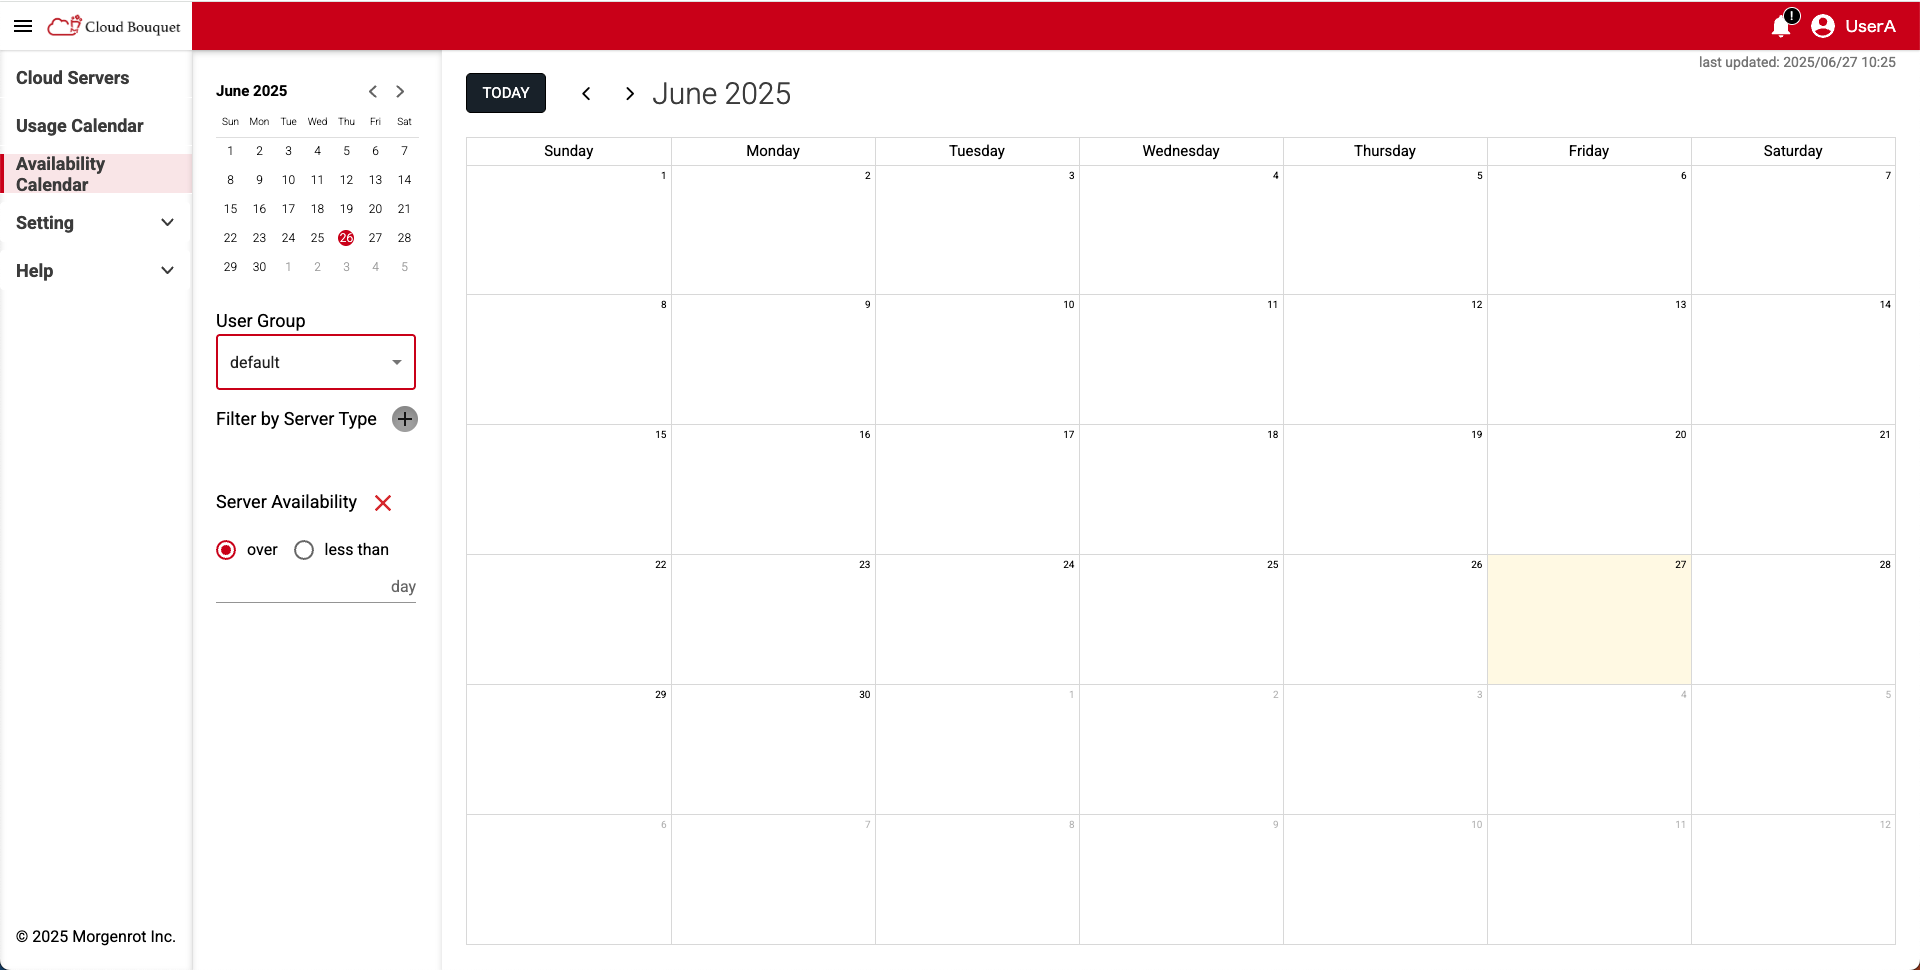
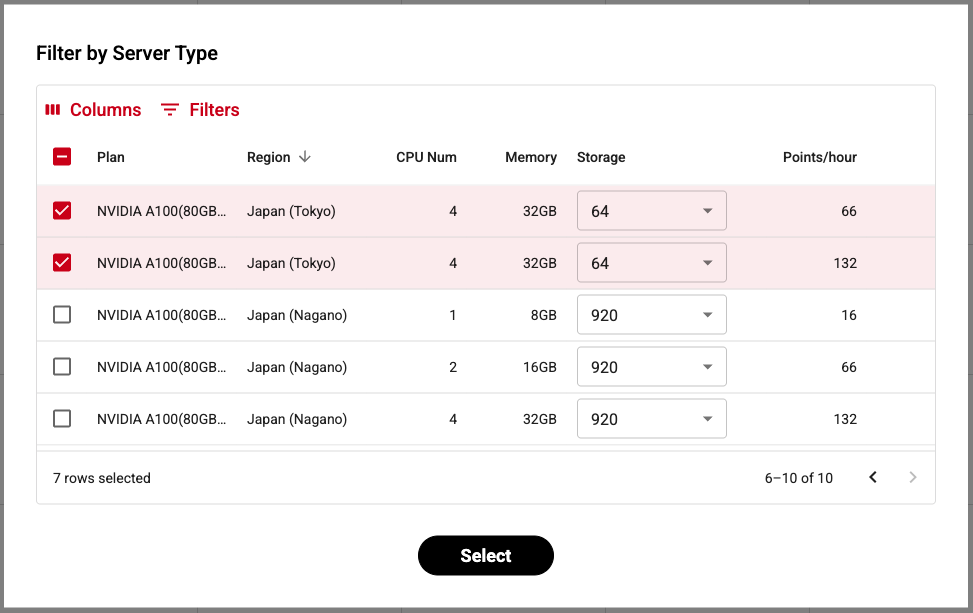
- From the left menu of the 【Availability Calendar】, select 「User Group」 and click the [Filter by Server Type] button to display a list of compute server specifications.
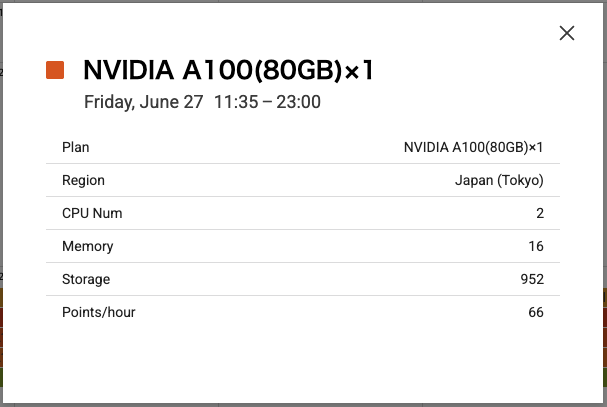
| Item | Description |
|---|---|
| Plan | Plan name. Displays the name and number of GPUs installed on the compute server. |
| Region | Name of reservable Region. |
| CPU Num | Number of CPUs. |
| Memory | Memory capacity. |
| Storage | Storage capacity. You can select the desired capacity from the pull-down menu. |
| Points/hour | Unit price of the compute server. Displayed in points per hour. |
- In 【Filter by Server Type】 (Compute Server Specifications List), select your desired Plan and click the [Select] button.
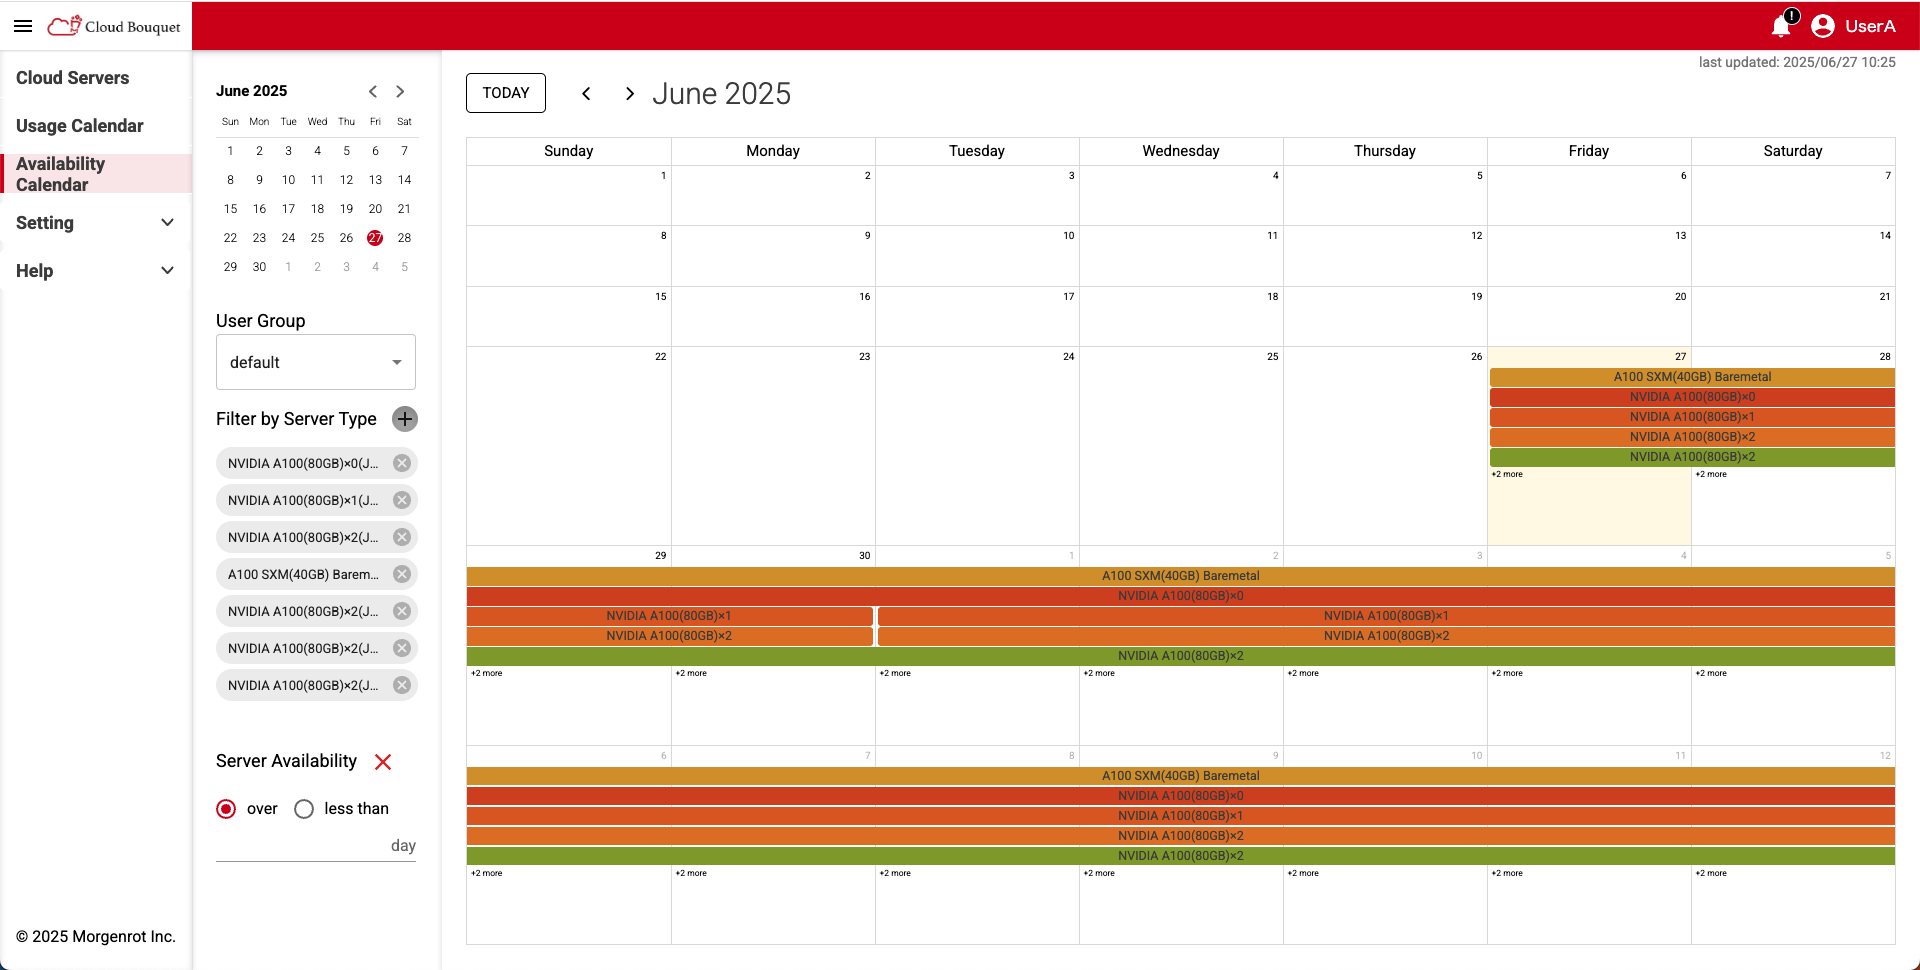
- The availability of the selected Plan is displayed as blocks on the 【Availability Calendar】 screen.
The period during which blocks are displayed indicates that the Plan can be reserved.
If you want to check the availability of another Plan, click the [Filter by Server Type] button again and select the Plan you wish to check.
TIPS!
Availability can be checked until the end of the month two months from the current date and time.
Ex.)
For 2024/12/20 10:00, the display period is 2024/12/20 10:00 to 2025/2/28 23:59.
TIPS!
- The following operations are possible on the 【Availability Calendar】 screen:
- You can switch the displayed month using the [<] and [>] buttons at the top of the screen.
- You can also directly select a specific month using the calendar in the upper left.
- Under 「Server Availability」 in the lower left, you can narrow down availability by usage period.
Item Description day Enter the period of use in days. over Display servers that are available for more than the number of days entered. less than Display servers that are available only for less than the number of days entered.
- Clicking an availability block displayed on the calendar will show detailed information for the corresponding period and selected Plan.
- Clicking a date on the calendar switches the display from month view to week view.
In week view, periods that are already reserved are displayed as gray blocks.
You can return to month view by clicking the [MONTH] button at the top of the week view calendar.
The above completes the procedure for checking availability before reserving a compute server.
2.2. Reserving a Compute Server
The reservation of a compute server consists of Steps 1 to 3.
This section describes the content and operation method of each step in order.
2.2.1. Reserving a Compute Server (Step 1)
- Open the 【Cloud Servers】 screen from the left menu.
TIPS!
If the [+Add Calc Server] button is not displayed, select the 《Calc Server》 tab at the top of the screen.
Clicking the [+Add Calc Server] button in the upper right corner of the screen displays the 【Select Server Type】 screen.
On the 【Select Server Type】 screen, a list of pre-configured regions and compute server specifications is displayed, so select the specifications of the compute server you wish to launch (only available regions are displayed).
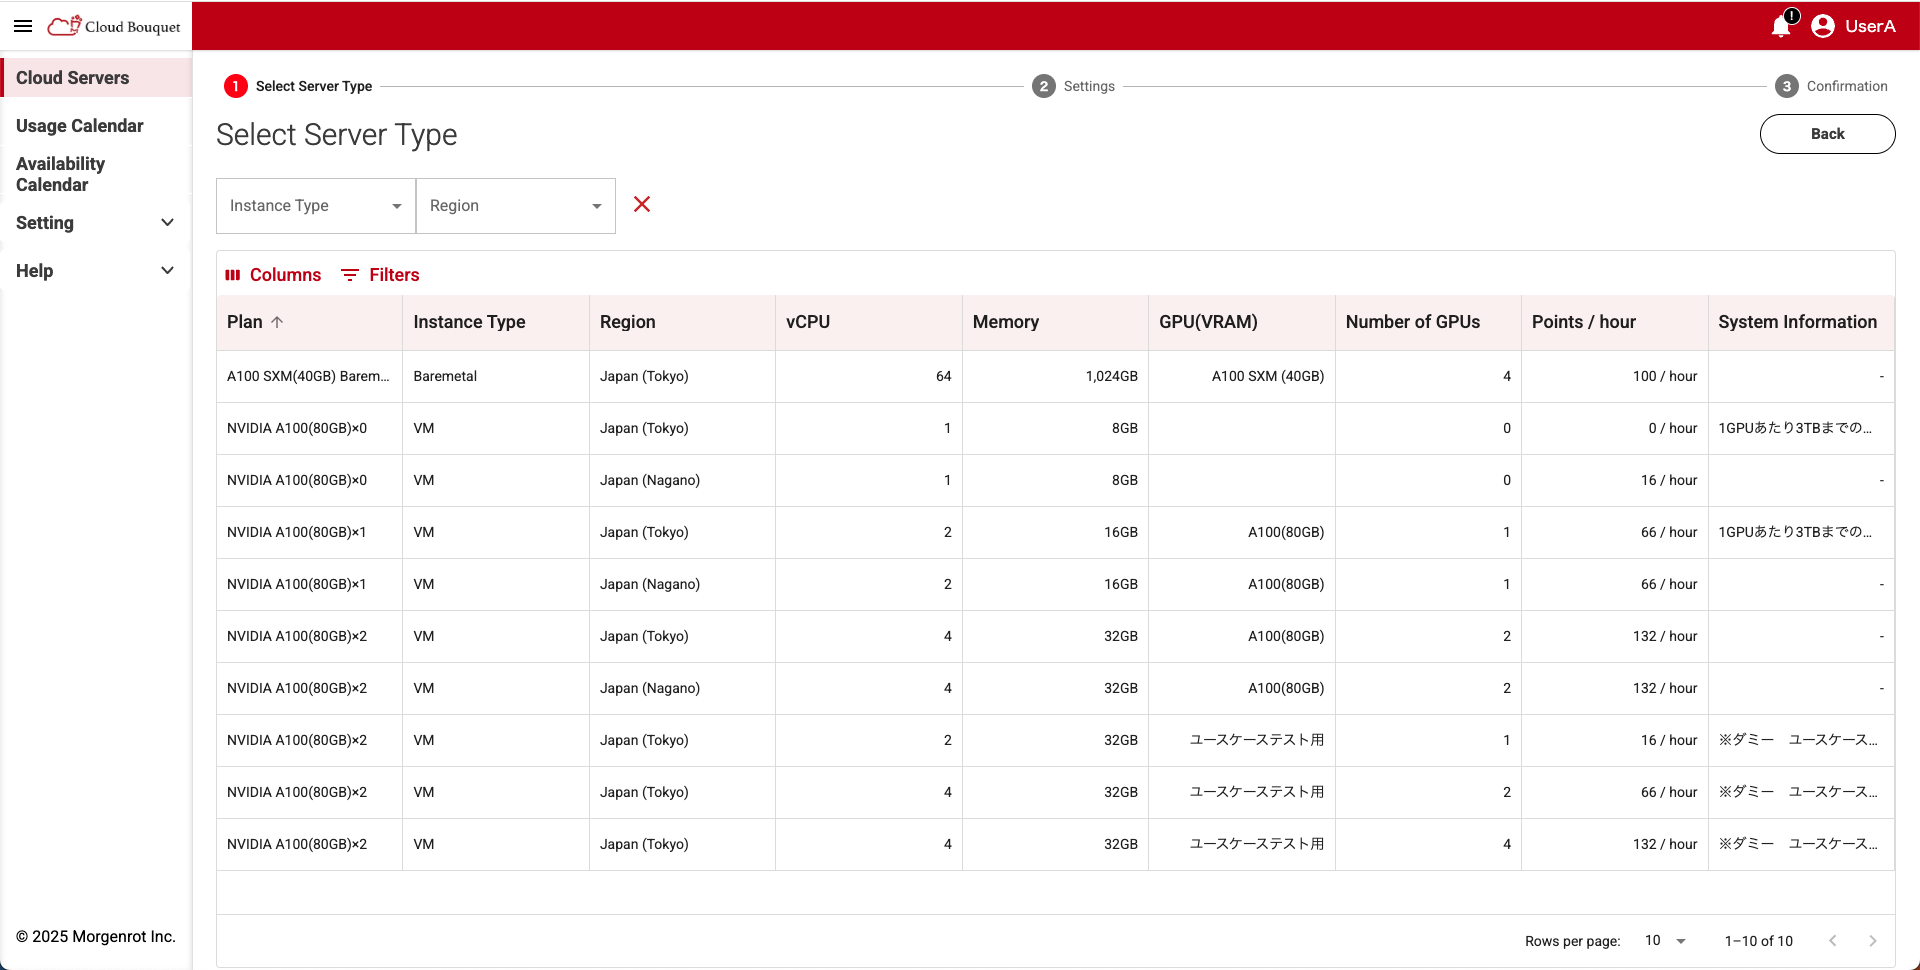
The specifications to be displayed can be selected from the 「Instance Type」 and 「Region」 pull-down menus in the upper left of the screen.
Additionally, by using the 〈Columns〉 menu and 〈Filters〉 menu in the upper left of the list, you can switch display items and filter data.
TIPS!
Regions available for a user group can be confirmed on the 【Region Control】 screen (administrator only).
For more information, see Setting Regions for User Groups for details.
The specifications of each compute server are as follows:
| Item | Description |
|---|---|
| Plan | Compute server plan name. |
| Instance Type | Type of compute server Two types: 「VM」 and 「Baremetal」. |
| Region | Region name. |
| vCPU | Number of CPUs. |
| GPU(VRAM) | GPU name. |
| Number of GPUs | Number of GPUs. |
| Memory | Memory capacity. |
| Points / hour | Unit price. (points per hour) |
| System Information | Notes and remarks regarding the compute server. |
TIPS!
The notes displayed in the 「System Information」 field can be viewed in full by hovering your mouse over the relevant section.
2.2.2. Reserving a Compute Server (Step 2)
- After selecting specifications on the 【Select Server Type】 screen, the 【Settings】 screen (Step 2) will be displayed.
Enter the required information in each field to configure detailed settings.
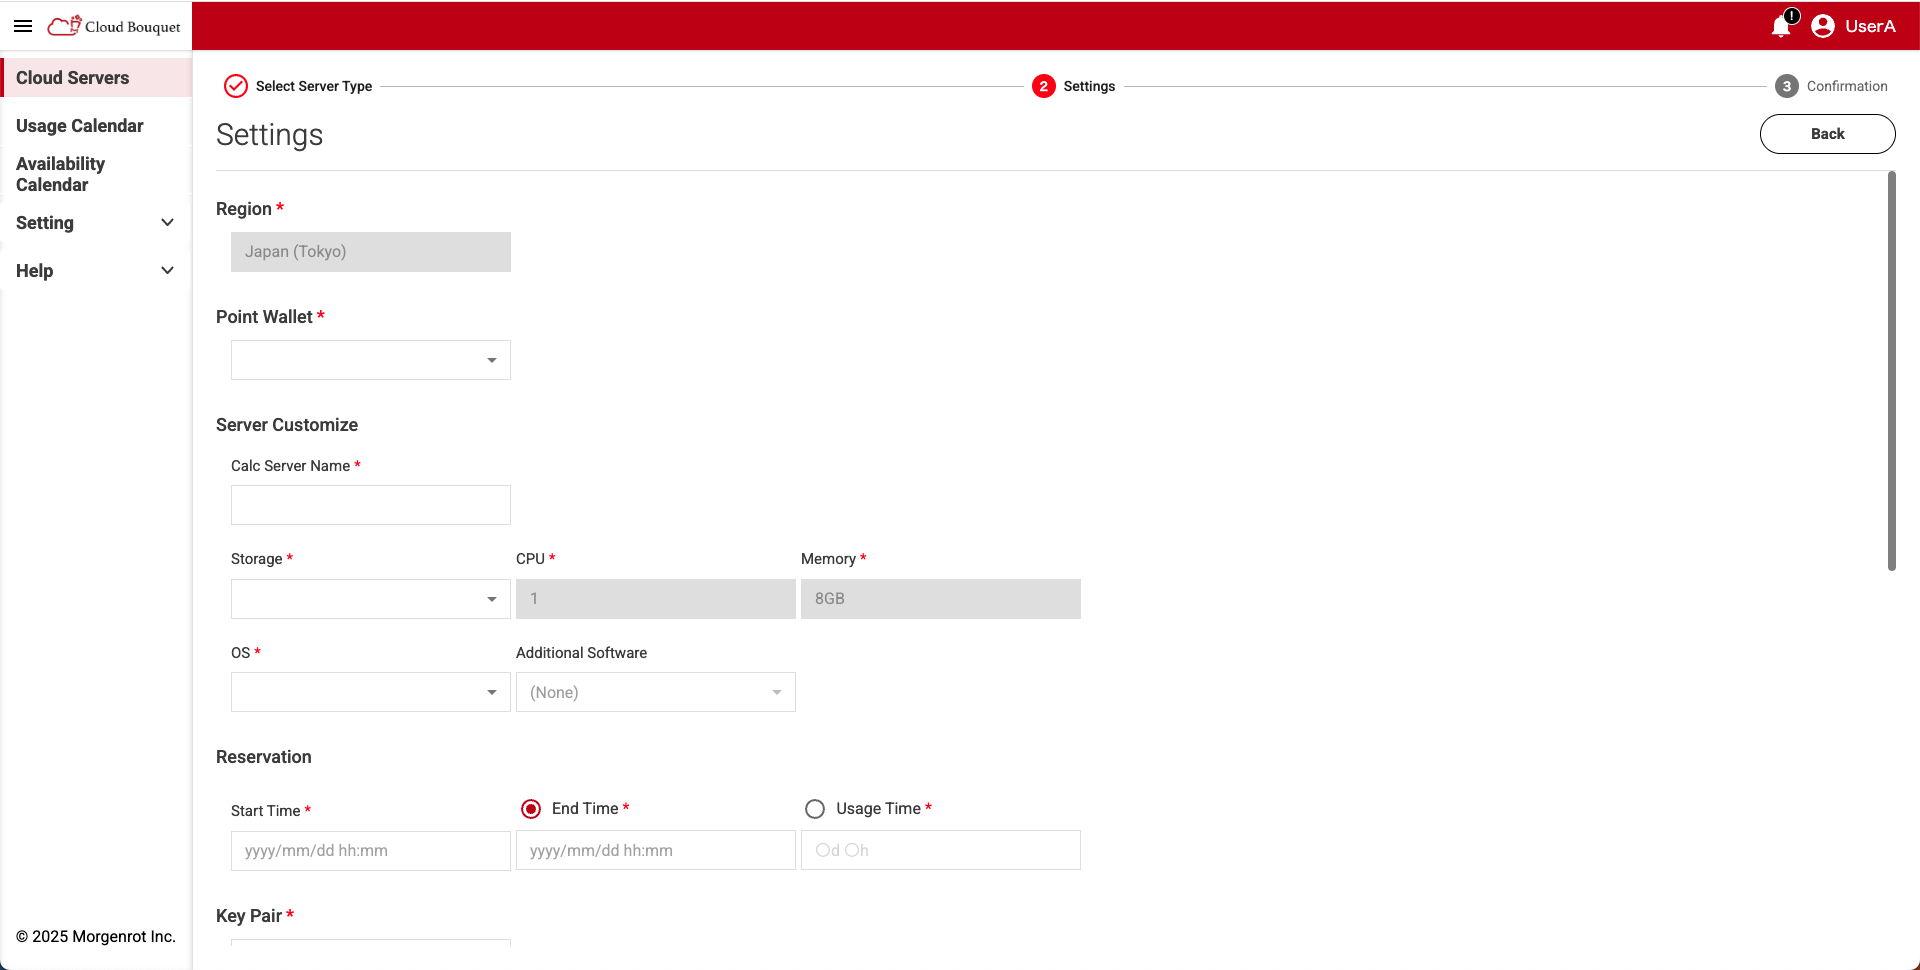
The following settings are configured on the 【Settings】 screen:
| Item | Description |
|---|---|
| Region | Region name. The content selected in Step 1 is displayed. |
| Point Wallet | User group name from which points are consumed. |
| Calc Server Name | Compute Server Name. Enter optionally. |
| Storage | Storage capacity. Select from the pull-down menu. |
| CPU | Number of CPUs. The content selected in Step 1 is displayed. |
| Memory | Memory capacity. The content selected in Step 1 is displayed. |
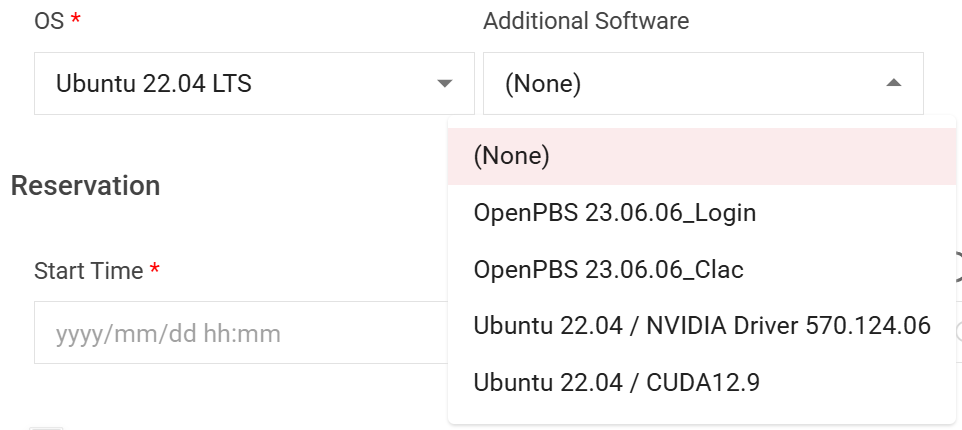
| OS | OS selectio. Can be selected from the pull-down menu. |
| Additional Software | Additional software selection. You can select software to be installed at startup from the pull-down menu, only if a compatible OS is selected. |
| Start Time | Scheduled start time. The compute server will start at this time. |
| End Time | Scheduled end time. The compute server will stop at this time. |
| Usage Time | Usage time. Enter the desired usage time. |
| Key Pair | Selection of associated key pair. Must be created in advance. |
| Notes | Optional notes field. Can be filled in freely. |
TIPS!
- Only user groups available in the selected 「Region」 are displayed in 「Point Wallet」.
- You can check the usable regions for each user group on the 【Region Control】 screen (administrator only).
For details, please refer to Setting Regions for User Groups.- Selecting 「Point Wallet」 enables the selection of 「Key Pair」.
- Changing 「Point Wallet」 resets 「Key Pair」.
TIPS!
- When using NVIDIA Driver or CUDA, you can select the “Additional Software” option on the compute server reservation screen. This will install the software during server startup, allowing you to use it immediately upon connection. We encourage you to take advantage of this feature.
(The availability and types of additional software may vary depending on the region, plan, and OS.)
TIPS!
- Either 「End Time」 or 「Usage Time」 must be entered.
Entering one will automatically fill in the other.
TIPS!
- Points that expire between the configured 「Start Time」 and 「End Time」 cannot be used.
Ex.)
If you only hold 5000 points that expire on 2025/03/10:
Reservations for the period 2025/03/05 to 2025/03/15 are not possible.
To make a reservation for this period, points valid after 2025/03/15 are required.
TIPS!
- The key pair to be used for 「Key Pair」 must be created in advance on the 【Key Pairs】 screen. (For details, please refer to How to Register Key Pairs.)
- Depending on the configured content, the following information will be displayed at the bottom of the screen.
Confirm the content and click the [Confirm] button at the bottom of the screen to proceed to Reservation Confirmation (Step 3).
「Pre-Calculated Points」 are calculated each time based on the entered content.
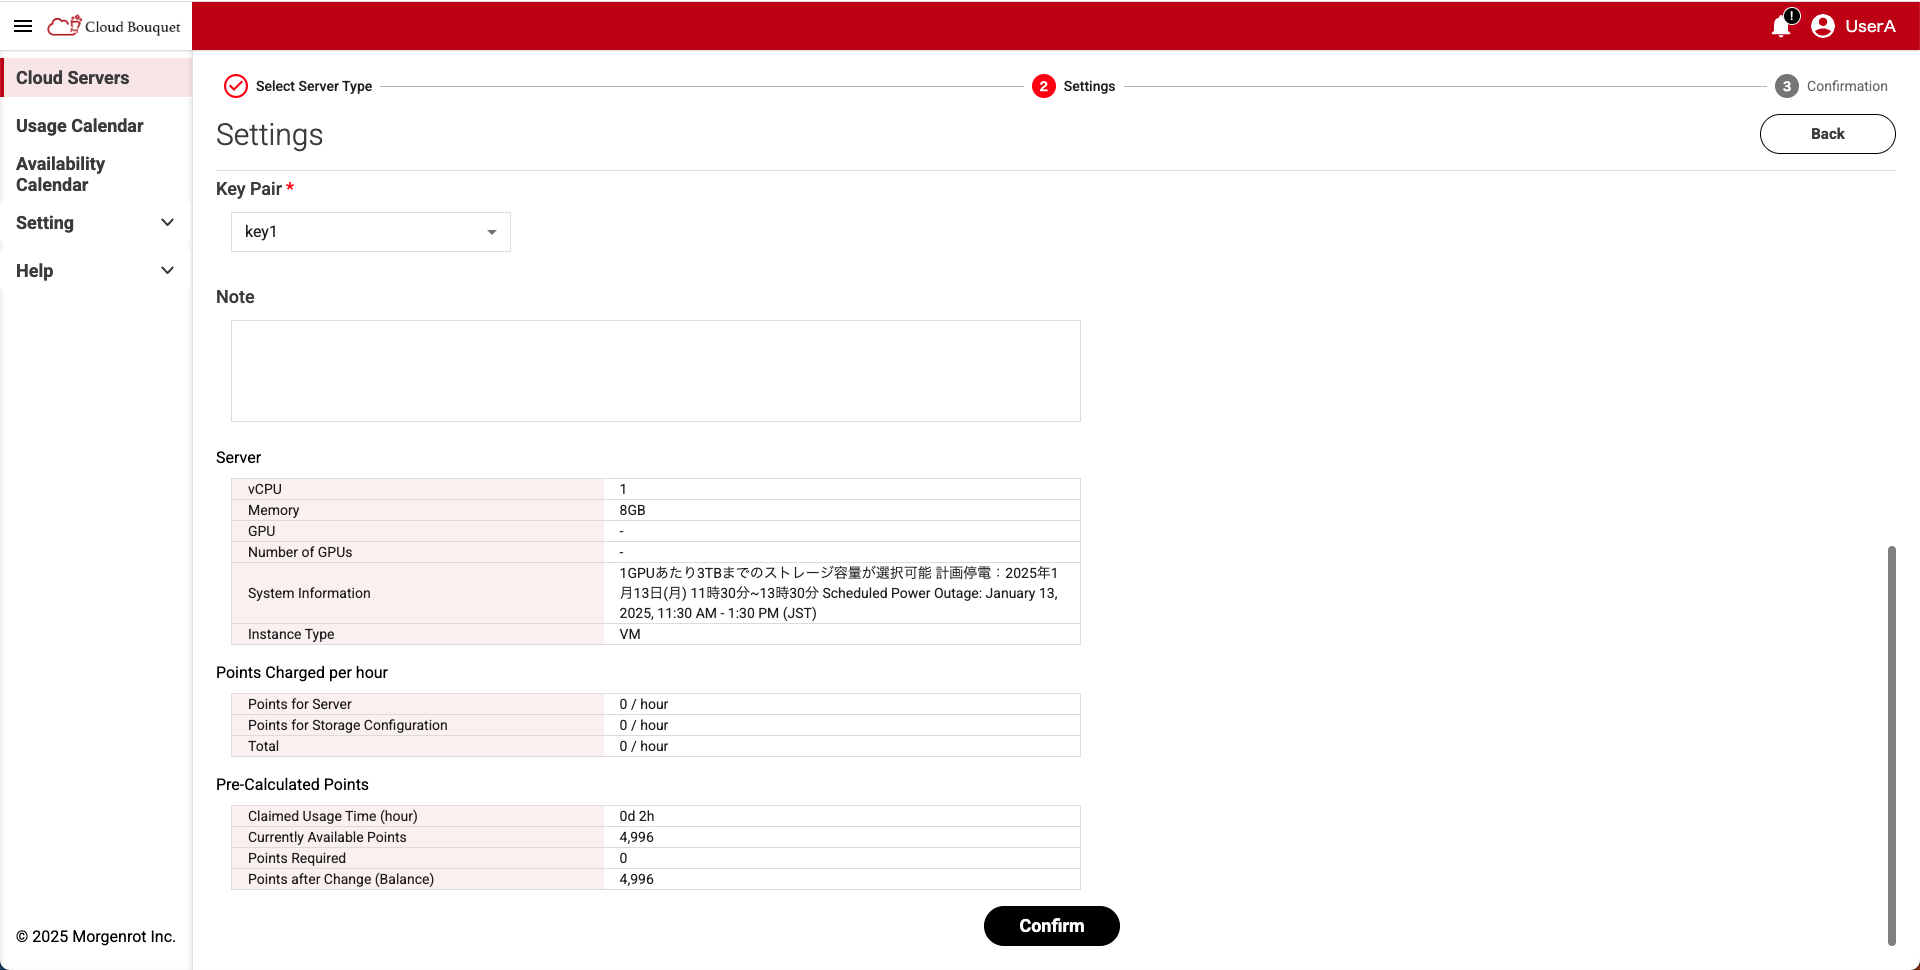
| Category | Item | Description |
|---|---|---|
| Server | vCPU | Number of CPUs. |
| Memory | Memory capacity. | |
| GPU | GPU name. | |
| Number of GPUs | Number of GPUs installed. | |
| System Information | Notes and remarks. | |
| Instance Type | Type of compute server. Two types: 「VM」 and 「Baremetal」 | |
| Points Charged per hour | Points for Server | Server unit price.(per hour) |
| Points for Storage Configuration | Storage unit price.(per hour) | |
| Total | Total unit price.(per hour) | |
| Pre-Calculated Points | Claimed Usage Time (hour) | Usage time.(in hours) Used to calculate the number of points consumed. |
| Currently Available Points | Current point balance of the user group selected in 「Point Wallet」. | |
| Points Required | Number of points consumed. Estimated according to the settings. | |
| Points after Change(Balance) | Balance of the user group after points are consumed. |
TIPS!
- If the point balance falls below the required number of points at the time of reservation, the reservation cannot be made.
TIPS!
- Clicking the [Confirm] button executes the reservation confirmation process based on the specified content.
If the reservation cannot be made due to unmet conditions, return to Reservation Confirmation (2.1. Confirming Compute Server Availability) and perform the reservation operation again.
2.2.3. Reserving a Compute Server (Step 3)
After completing the detailed settings on the 【Settings】 screen (Step 2) and clicking the [Confirm] button, you will proceed to the 【Confirmation】 screen (Step 3).
On this screen, you will make the final confirmation of your reservation details.
- Confirm the content, agree to the Terms of Use, and then click the [Reserve] button.
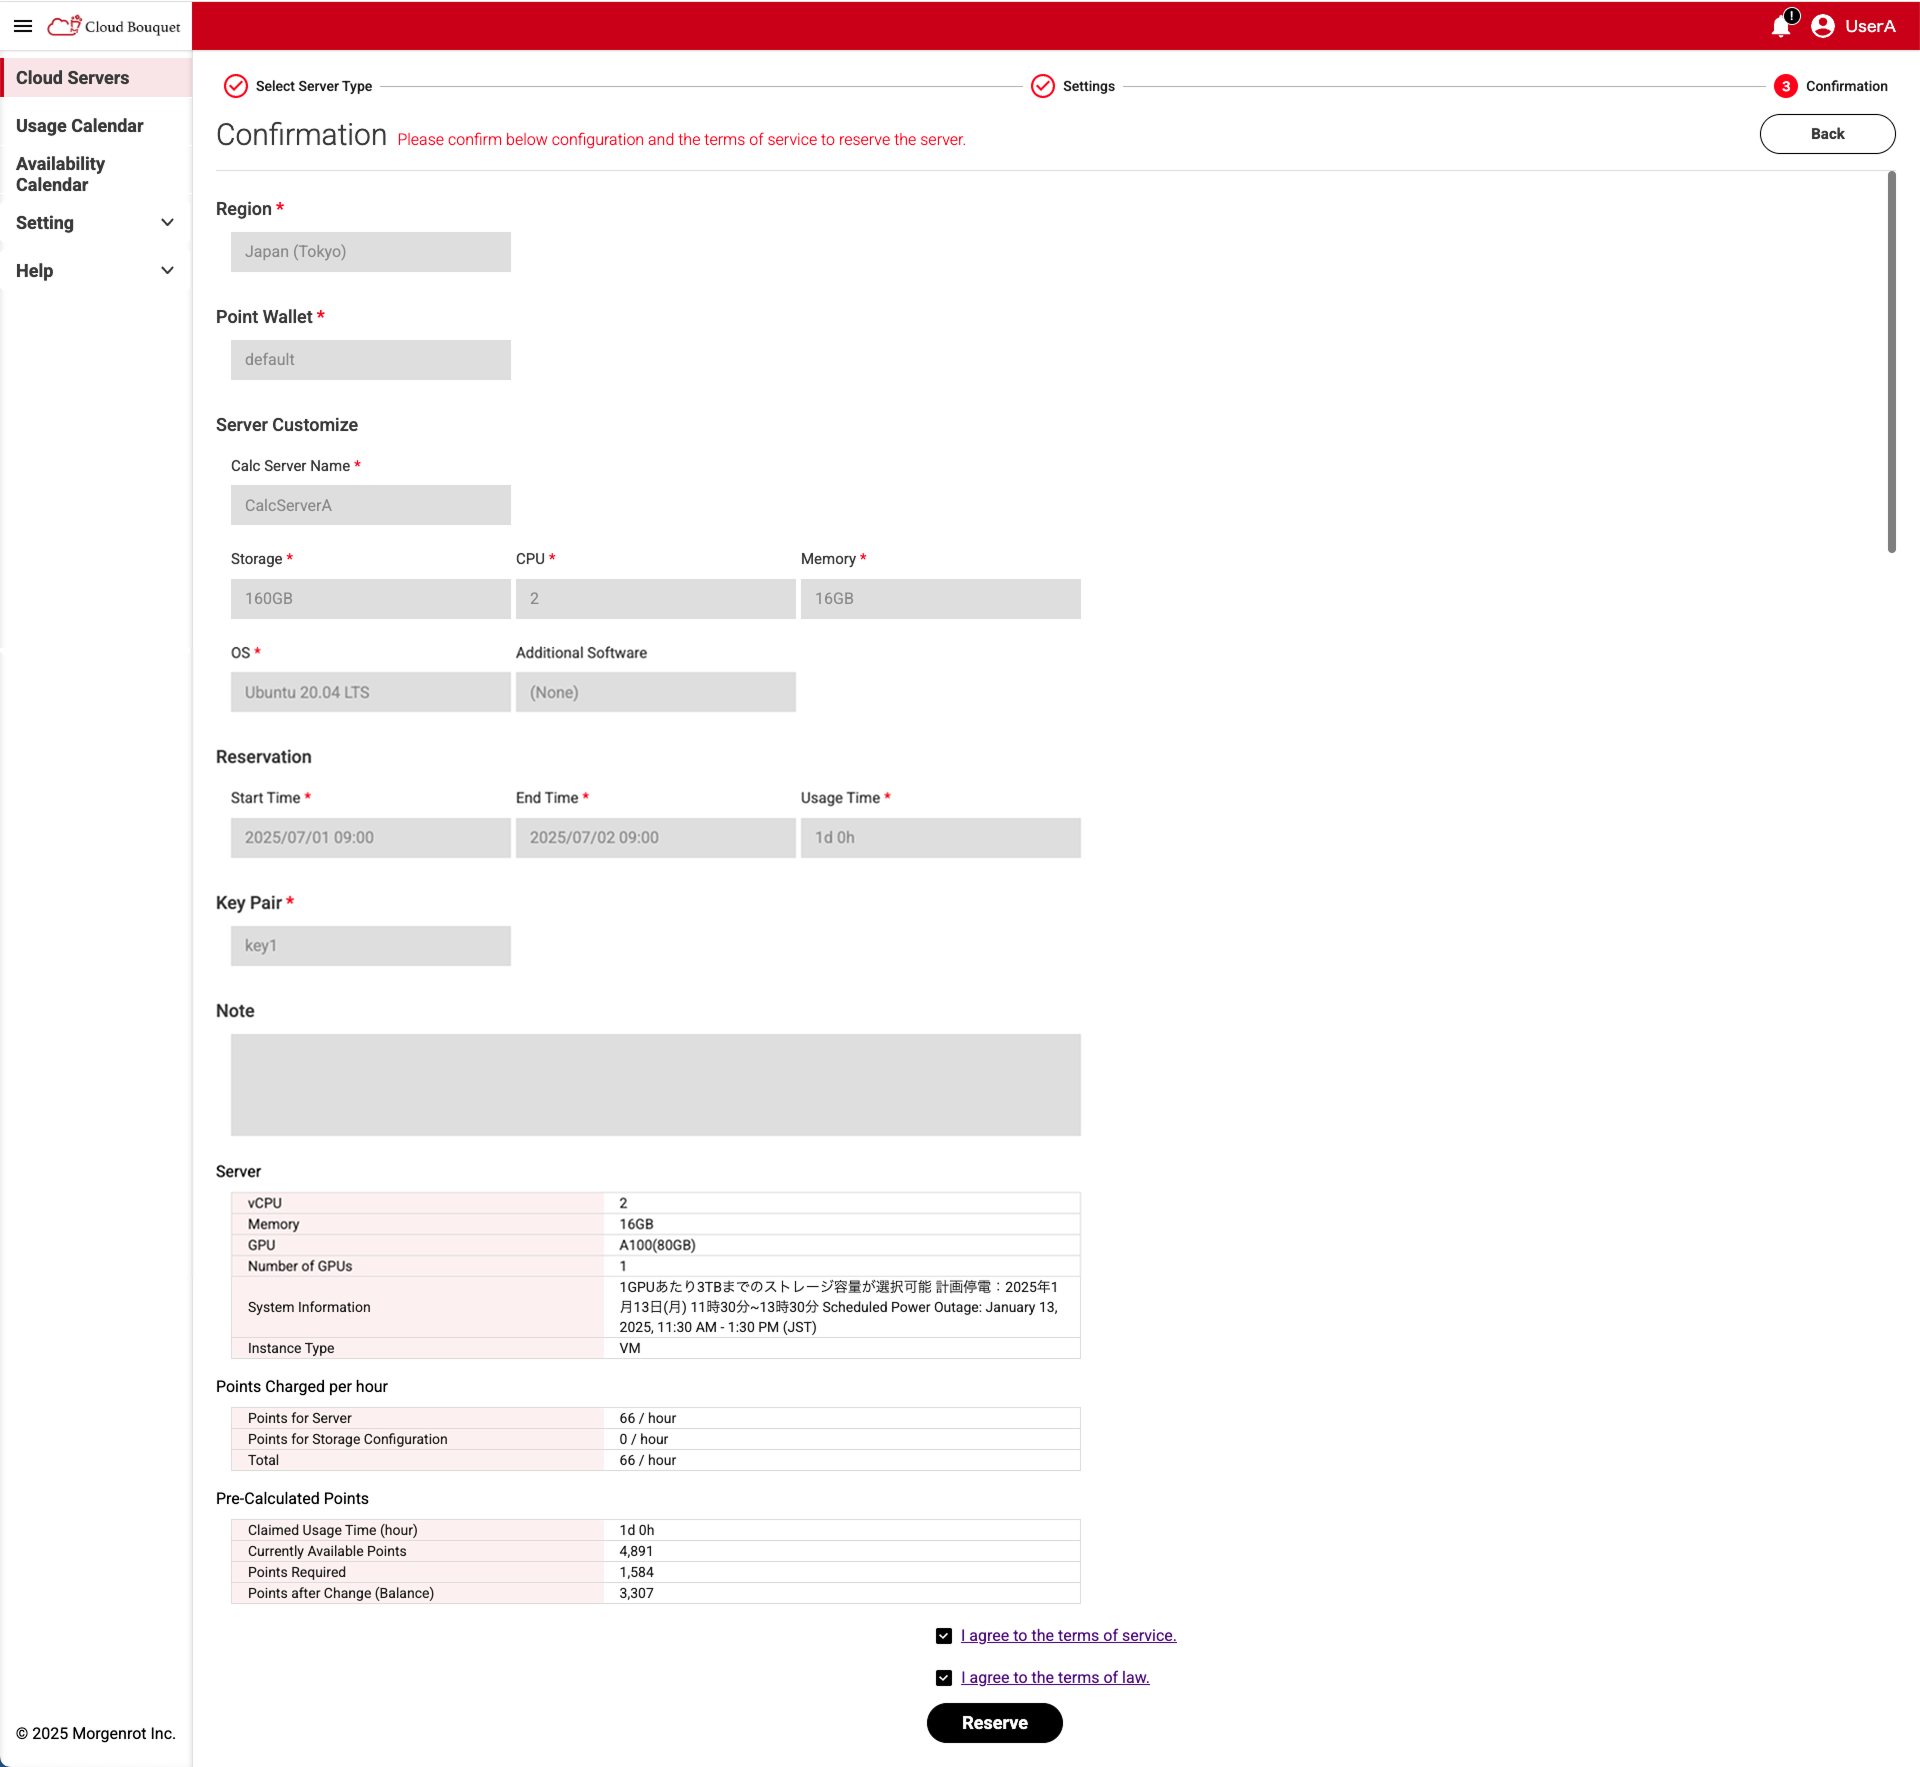
TIPS!
If you agree to the Terms of Use and fill in the check mark, the [Reserve] button will be enabled.
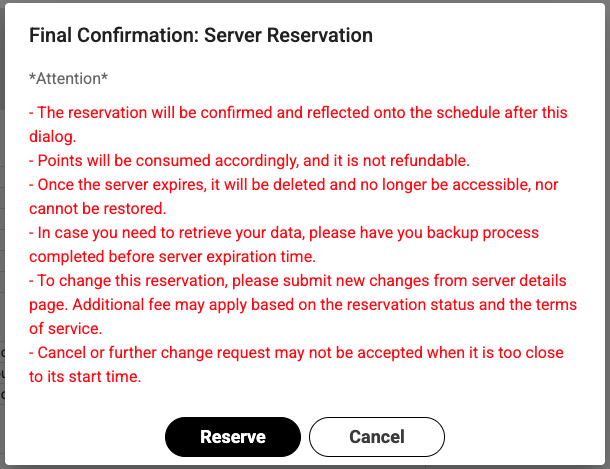
- The 【Final Confirmation: Server Reservation】 screen will be displayed.
After confirming the notes, click the [Reserve] button again to execute the compute server reservation.
2.2.4. Confirmation After Reservation
After reserving a compute server, you can check the reservation status in the 〈Usage Calendar〉(on the 【Usage Calendar】 screen) from the left menu.
This screen displays a weekly calendar, and the periods for which a compute server is reserved are shown as blocks (reservation blocks are displayed in any color).
You can change the displayed week by selecting a date from the monthly calendar in the upper left of the screen. Additionally, you can narrow down the displayed servers using the 「Region」 field and 「Server Status」 field.
| Item | Description |
|---|---|
| Region field | The region to be displayed. Each server type can be identified by an icon. |
| Server Status field | Server status options. By selecting 「Downtime on login servers」 etc., you can display login server downtime information on the calendar. |
| Icon | Description |
|---|---|
| Compute Server Icon | |
| Login Server Icon |
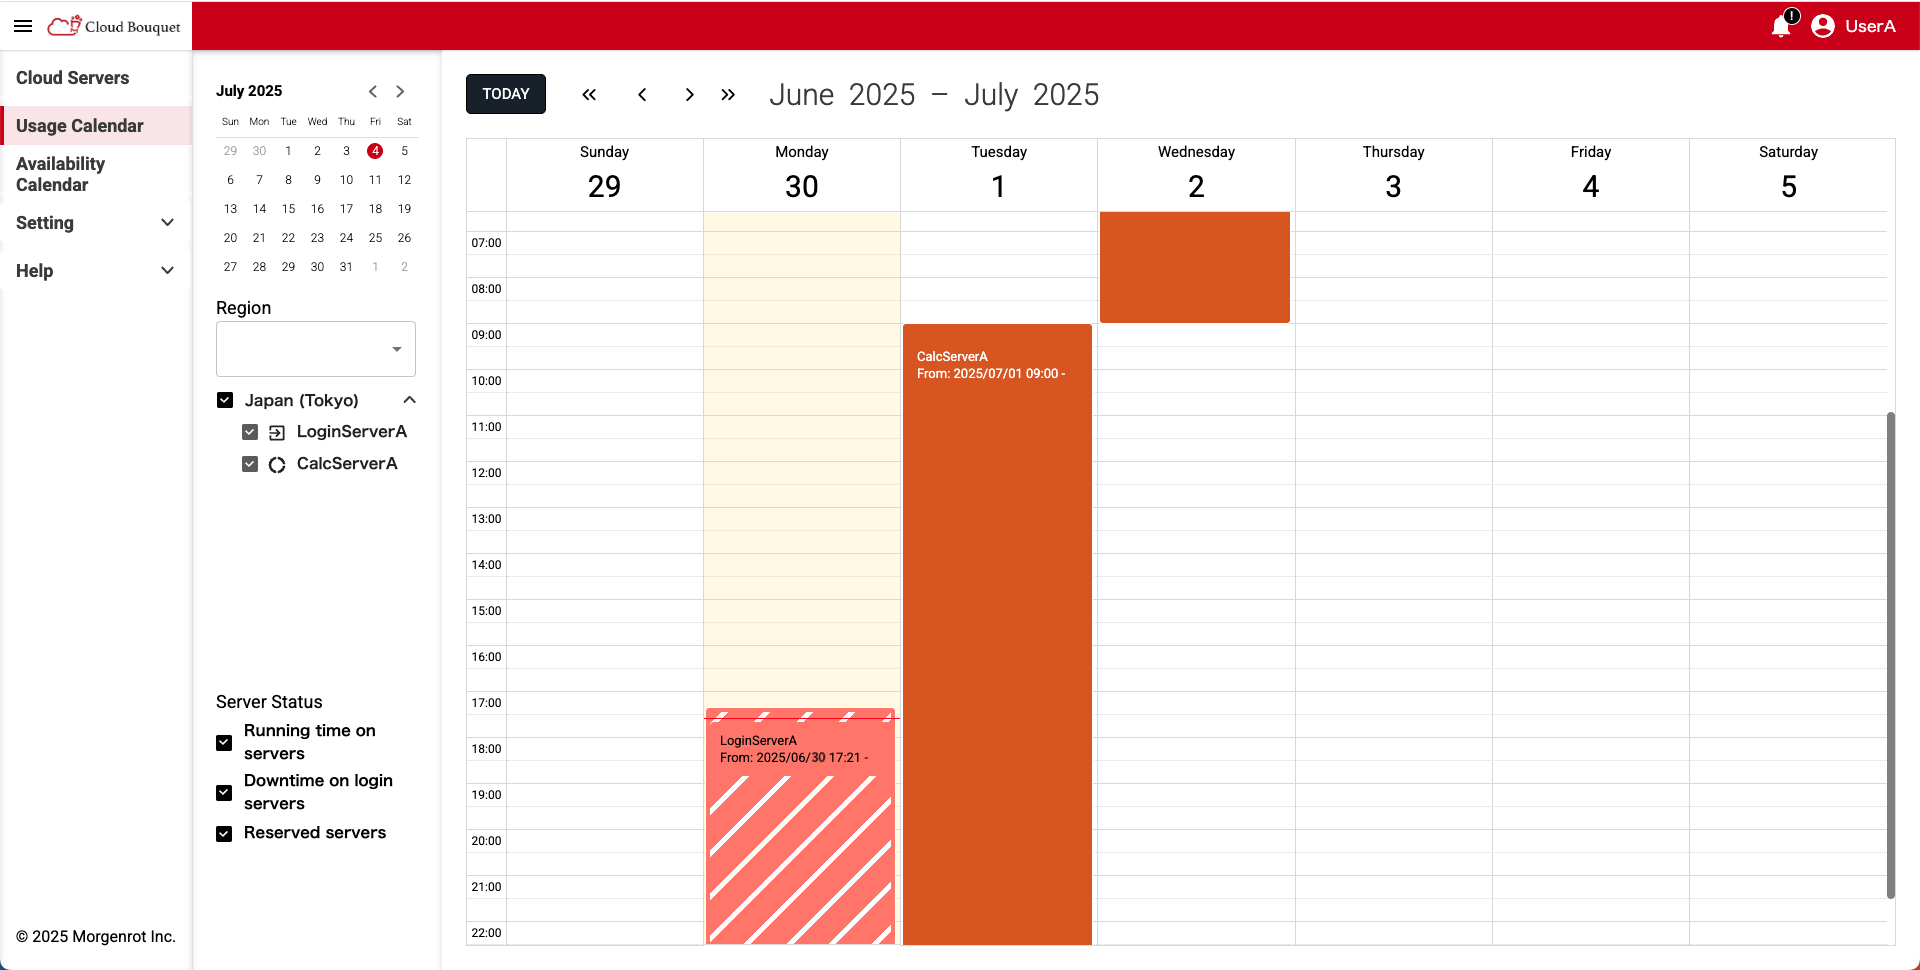
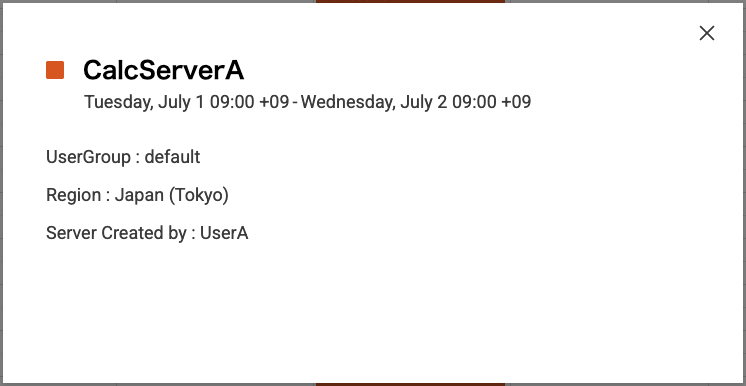
Clicking a reservation block on the calendar allows you to check details of the reservation, such as the scheduled start time, scheduled end time, and status.
This concludes the reservation and confirmation of a compute server.
Thereafter, when the configured 「Start Time」 is reached, the reserved compute server launch process will be executed, and you can use the compute server until the 「End Time」 is reached.
NOTICE!
It usually takes 5 to 15 minutes to start up the compute server.
NOTICE!
When 「End Time」 is reached, the calculation server configuration environment and all stored data will be deleted.
Be sure to confirm in advance whether or not a backup is required.
2.3. Changing a Reserved Compute Server
This section describes the procedure for changing the scheduled start time and scheduled end time after reserving a compute server.
Changes are limited to servers with a 「Reserved」 status and where the scheduled start time is not yet within 1 hour.
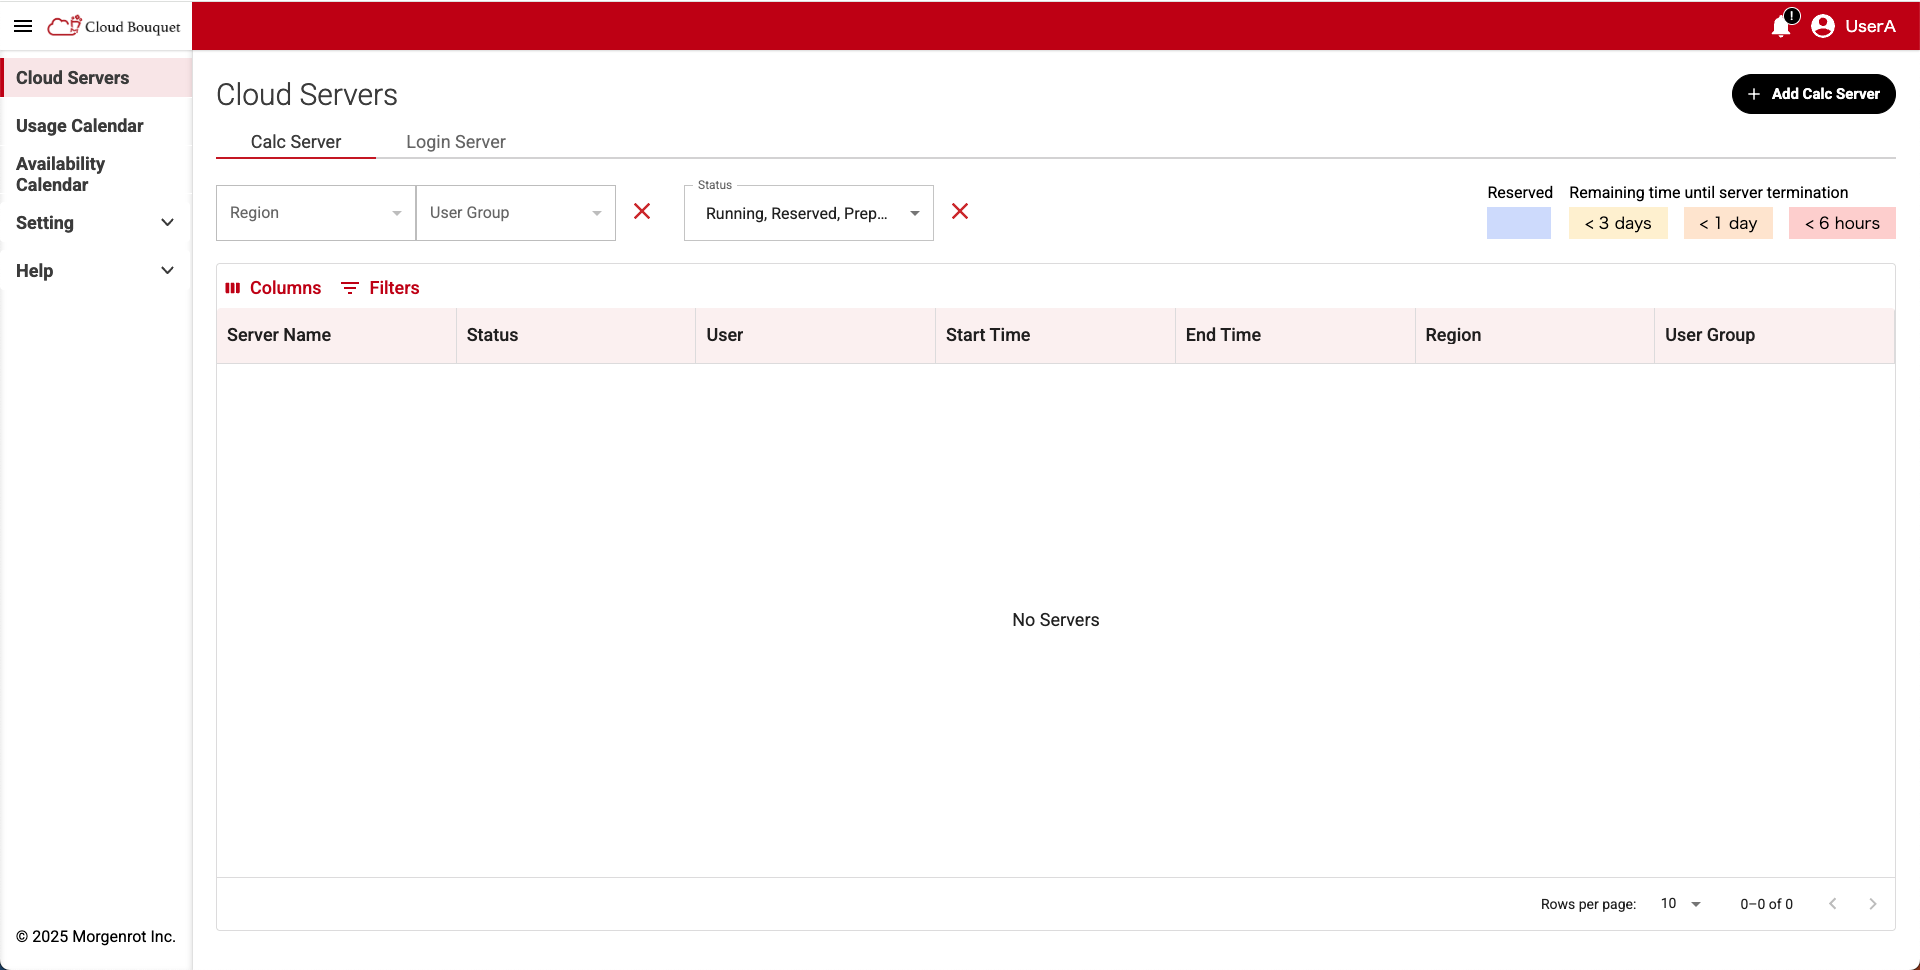
- Open the 【Cloud Servers】 screen from the left menu.
The screen displays a list of reserved and running compute servers.
TIPS!
If the list of calculation servers is not displayed, select the 《Calc Server》 tab at the top of the 【Cloud Servers】 screen.
TIPS!
- Changes to a server’s reserved time period can only be performed by users who are members of the user group that made the reservation (the same user group wallet).
For example, if a user belongs to user groups A and B, and the server is reserved in group A(wallet A), any modification operations must also be performed in group A.
- Selecting the target server from the list will display its details.
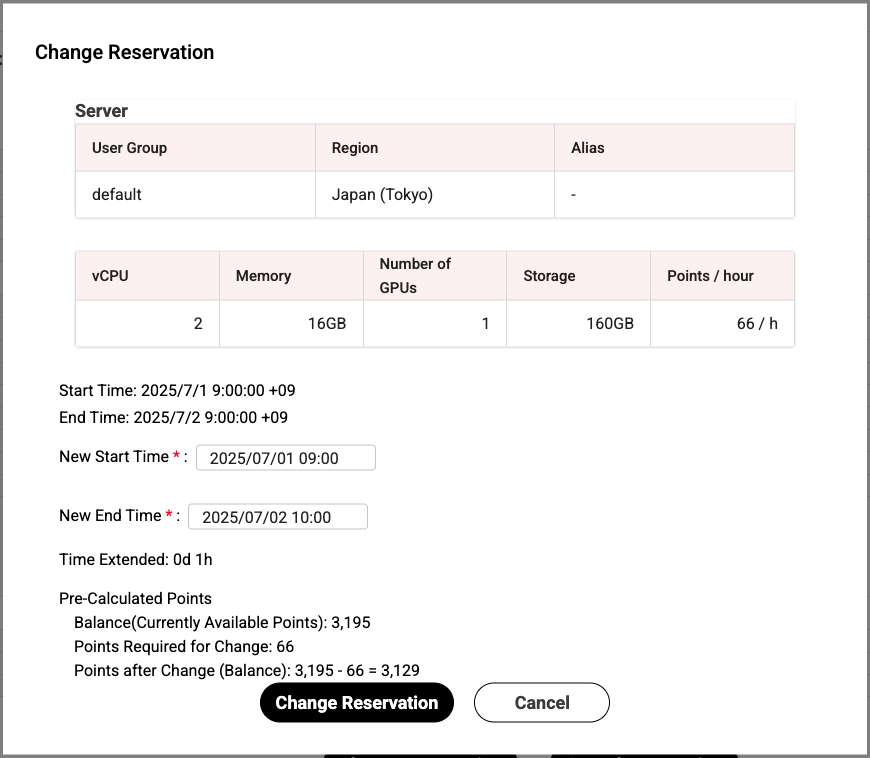
- Clicking the [Change Reservation] button displays the 【Change Reservation】 pop-up screen.
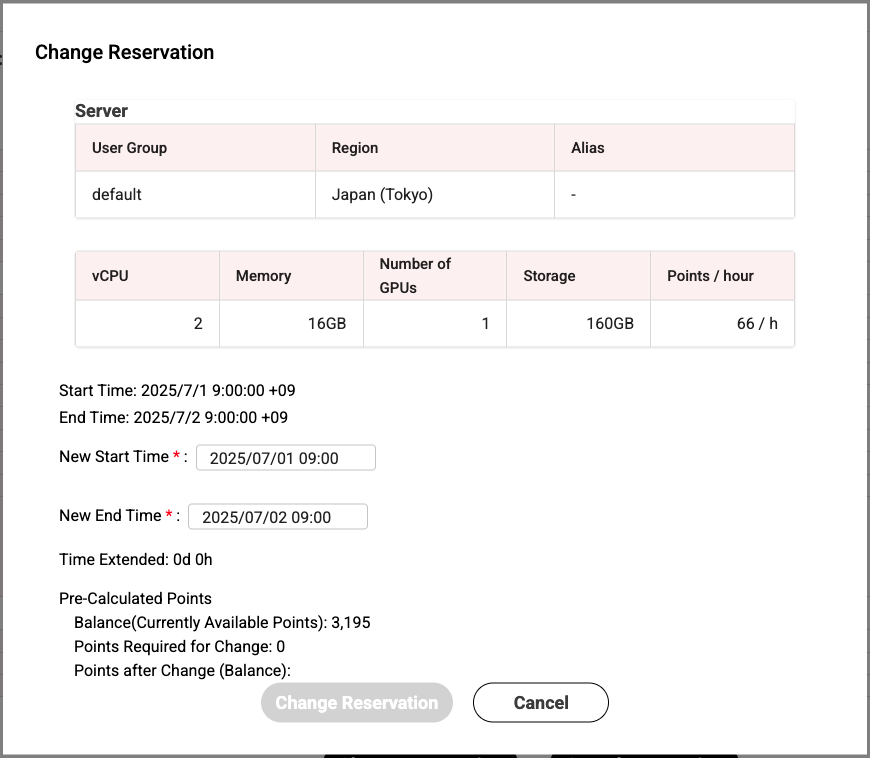
The screen displays the following information, including the server configuration at the time of reservation, the times to be changed, and the point estimate associated with the change.
| Location | Item | Description |
|---|---|---|
| Server | User Group | The user group that reserved the server. The wallet from which points are consumed. |
| Region | Region name. | |
| Alias | Alias name used for login. | |
| vCPU | Number of CPUs. | |
| Memory | Memory capacity. | |
| Number of GPUs | Number of GPUs. | |
| Storage | Storage capacity. | |
| Points / hour | Unit price.(points per hour) | |
| Bottom of screen | Start Time | Original scheduled start time. |
| End Time | Original scheduled end time. | |
| New Start Time | New scheduled start time. | |
| New End Time | New scheduled end time. | |
| Time Extended (Displayed by entering New Start Time and New End Time) | Extended usage time.(in hours) | |
| Balance(Currently Available Points) | Current wallet balance. | |
| Points Required for Change | Number of points required for the change. | |
| Points after Change(Balance) | Wallet balance after the change. |
TIPS!
- Depending on the update of displayed items by entering 「New Start Time」 or 「New End Time」, 「Time Extended」 and 「Pre-Calculated Points」 will display the changed usage time, required points, and point balance.
- Confirm the content and, if you wish to execute the reservation change, click the [Change Reservation] button.
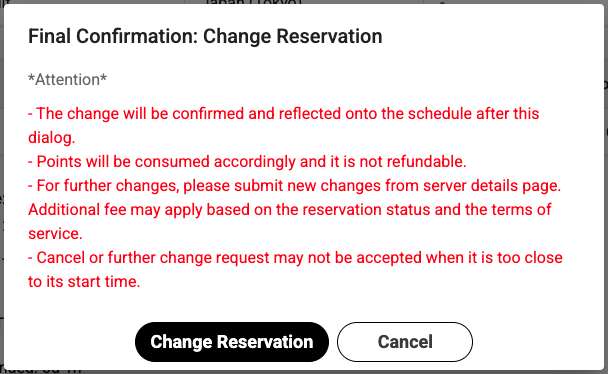
- The 【Final Confirmation: Change Reservation】 screen will be displayed.
After confirming the notes, click the [Change Reservation] button again to execute the reservation change.
TIPS!
- If the wallet balance is insufficient, the change cannot be executed.
- Changes may not be possible depending on the reservation status before and after the reservation period.
2.4. Canceling a Reserved Compute Server
Cancellation of a compute server reservation can be performed for servers with a 「Reserved」 Status and where the scheduled start time (Start Time) is not yet within 10 minutes.
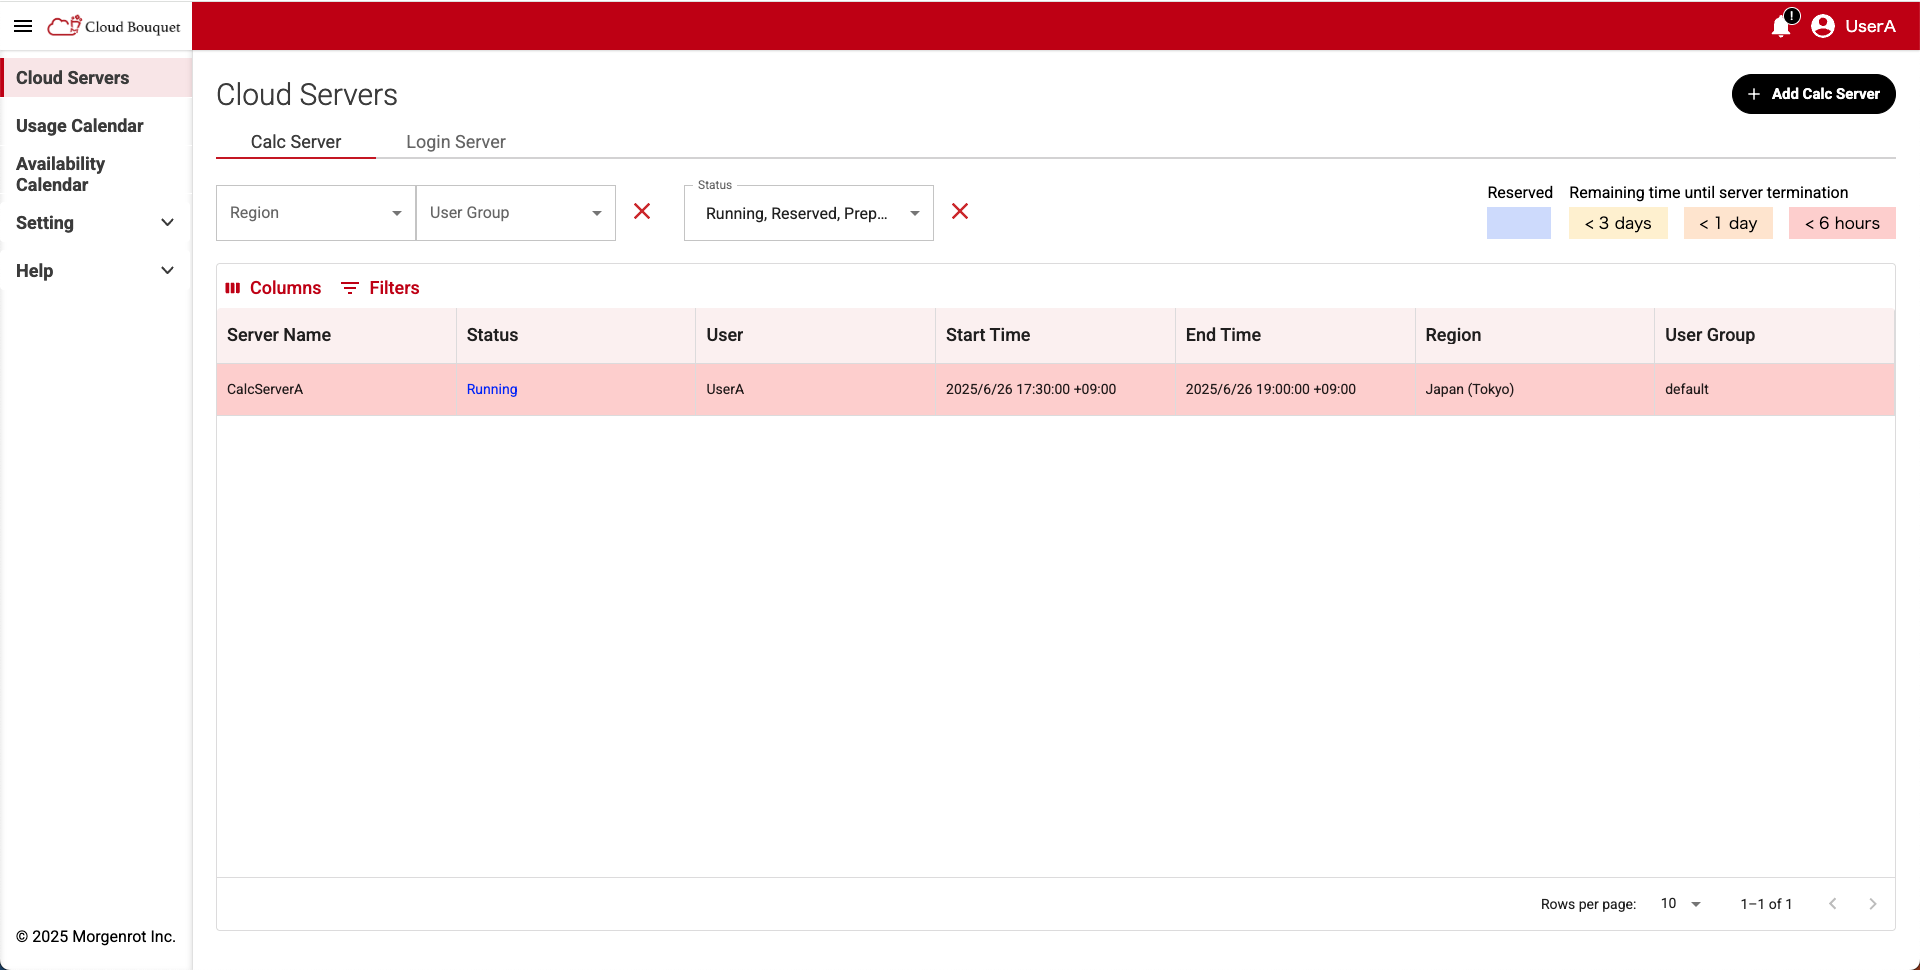
- Open the 【Cloud Servers】 screen from the left menu.
This screen displays a list of compute servers reserved or launched by the user.
TIPS!
- If the list of compute servers is not displayed, select the 《Calc Server》 tab at the top of the 【Cloud Servers】 screen.
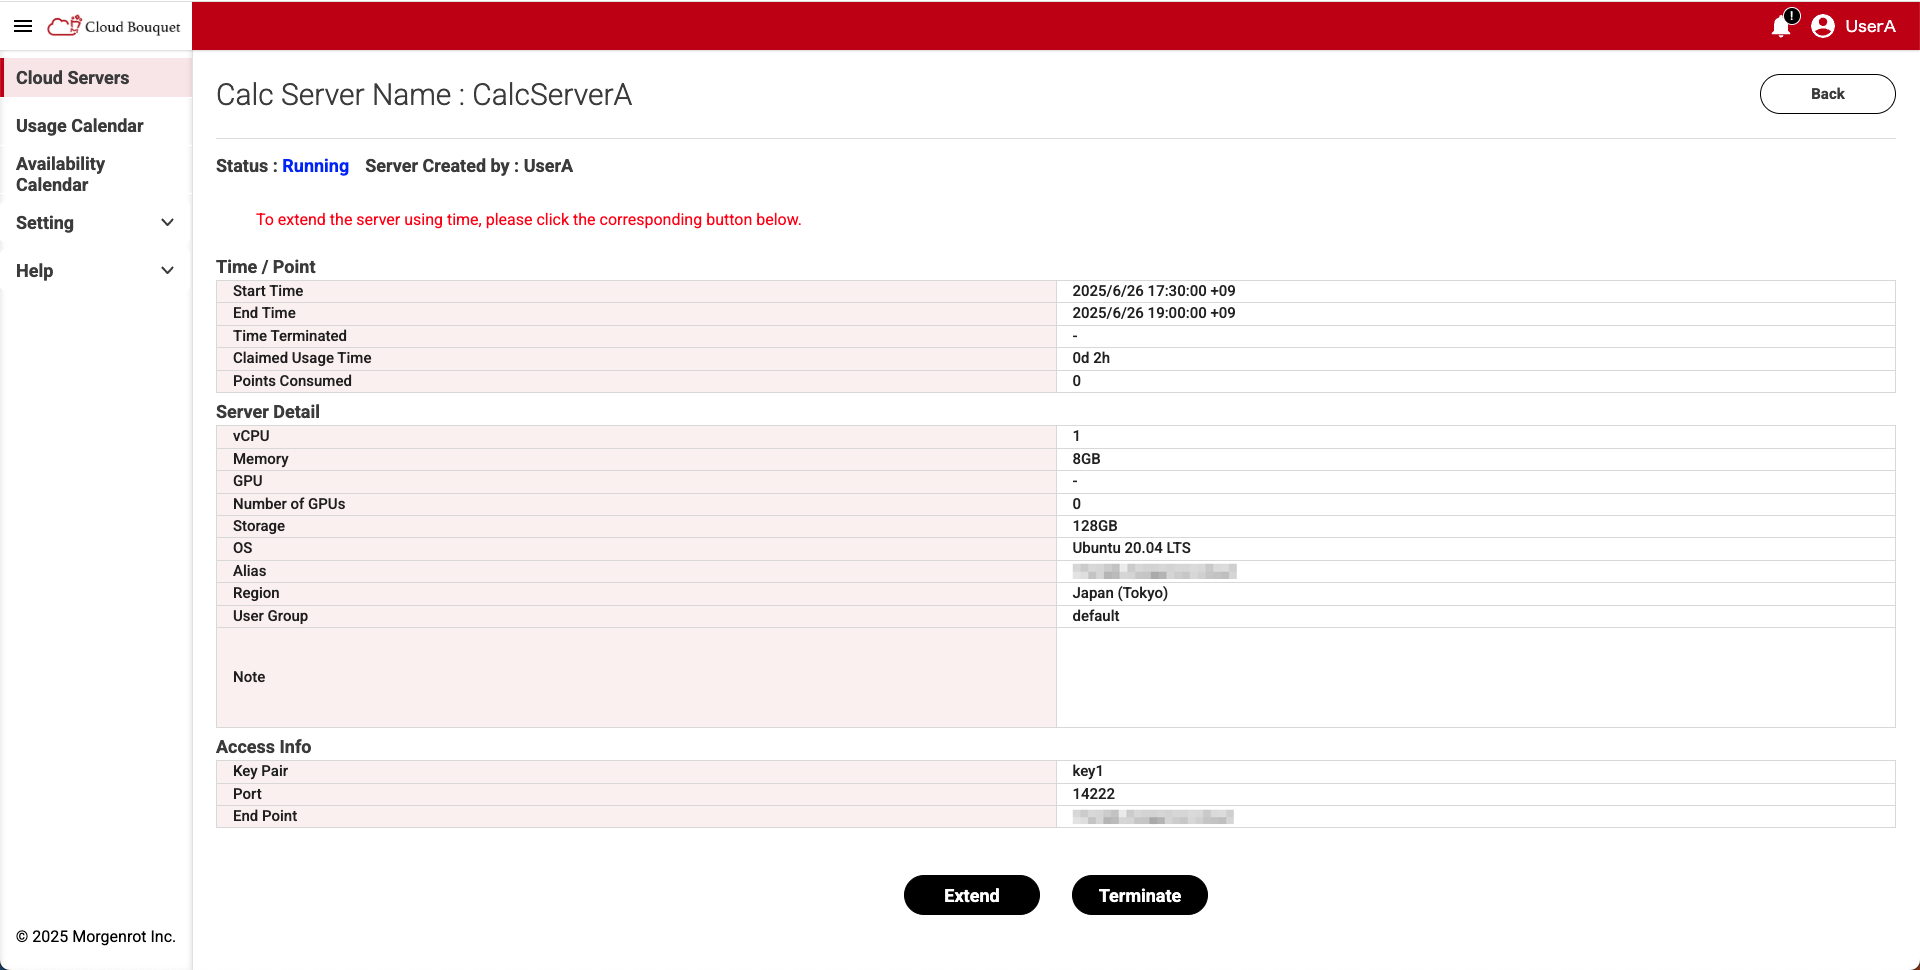
- Selecting the target compute server from the list will display its details screen.
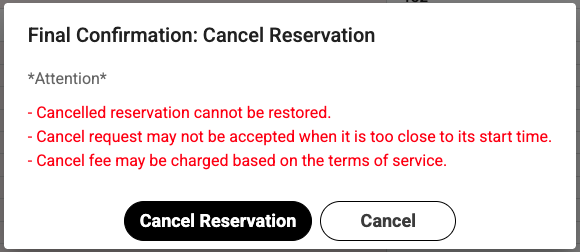
Confirm the content and, if you wish to execute the reservation cancellation, click the [Cancel Reservation] button.
The 【Final Confirmation: Cancel Reservation】 screen will be displayed.
After confirming the notes, click the [Cancel Reservation] button again to cancel the reservation.
TIPS!
- Similar to changing the reservation period, cancellation of a reservation can only be performed from the same user group (same user group wallet) as when the reservation was made.
For example, if a user belongs to user groups A and B, and reserved a server with group A (wallet A), the cancellation operation must also be performed with group A.
TIPS!
- When a reservation cancellation is executed, points that were scheduled to be consumed will be returned.
For point return, please click Point Refunds.
2.5. Use of Compute Server
This section describes the procedure for using a compute server.
To use a compute server, the following preparations must be completed.
- Compute server reservation (see 2.2. Reserving a Compute Server)
- Server launch completed according to the reserved start time
- Client PC preparation (SSH connection source)
2.5.1. Confirming Connection Information to the Compute Server
First, confirm the information required to connect to the compute server.
- Open the [Cloud Servers] screen from the left menu. (For details about the [Cloud Servers] screen, see 3.2. Checking the Usage Status for Compute Server.)
TIPS!
If the list of calculation servers is not displayed, select the 《Calc Server》 tab at the top of the 【Cloud Servers】 screen.
TIPS!
The server to be used must have a 「Running」 Status.
- Selecting the target compute server from the list displays the details screen.
On the details screen, check the following connection information.Location Item Description Access Info Key Pair Associated key pair. Port Port number. End Point End Point.
2.5.2. Connecting to the Compute Server
Next, we explain how to connect to the compute server.
- Connect from the client PC to the compute server using the 「Key Pair」, 「Port」, and 「End Point」 confirmed in 2.5.1. Confirming Connection Information to the Compute Server.
Here, the following information is used as an example.
Ex.)
- Key Pair file: sample.key
- Port: 12345
- End Point: sample@morgenrot.cloud
- Based on the above information, you can connect to the compute server by executing the ssh command as follows:
(Please change the key file reference path as appropriate for your client PC environment.)
ssh -i . /sample.key sample@morgenrot.cloud -p 12345
If the SSH connection is established without any problems, the connection to the compute server is confirmed.
Thereafter, the compute server can be used until the termination operation is performed.
NOTICE!
On the compute server, the reboot command (sudo reboot) can be executed.
However, if the shutdown command (sudo shutdown) is executed, it will not be possible to reboot from the user side.
Please avoid using the shutdown command.
If you have executed the shutdown command, please contact Cloud Bouquet Contact
TIPS!
If an error occurs during the SSH connection, there may be a problem with the key file’s browse permissions.
Check the permissions of the key file with the following command.ll sample.keyIf the execution rights are restricted as follows, there is no problem:
-rw-------@ 1 user user 399B 4 1 10:00 sample.keyIf all users have permissions, change them to the appropriate permissions:
-rwxrwxrwx@ 1 user user 399B 4 1 10:00 sample.keyExample of change command:
chmod 600 sample.key
2.6. Extension of Compute Server Usage Time
This section describes the procedure for extending the usage time of a compute server.
Extension operations can only be performed on compute servers whose Status is 「Running」 and whose scheduled end time (End Time) has not yet been reached.
- Open the 【Cloud Servers】 screen from the left menu.
This screen displays a list of all servers, including currently running compute servers, as well as reserved and terminated ones.
TIPS!
If the list of calculation servers is not displayed, select the 《Calc Server》 tab at the top of the 【Cloud Servers】 screen.
TIPS!
- Extension of server usage time can only be performed from the same user group (same user group wallet) as when the usage started.
For example, if a user belongs to user groups A and B, and launched a compute server with group A (wallet A), the extension operation must also be performed with group A (wallet A).
- Select the compute server you wish to extend from the list to display the details screen, then click the [Extend] button at the bottom of the screen.
- Clicking the [Extend] button displays the 【Server Time Extension】 pop-up screen.

The 【Server Time Extension】 pop-up screen displays the following information:
| Location | Item | Description |
|---|---|---|
| Server | User Group | Name of the user group wallet used when the server was launched. |
| Region | Region name. | |
| Alias | Server alias name. | |
| vCPU | Number of CPUs. | |
| Memory | Memory capacity. | |
| Number of GPUs | Number of GPUs. | |
| Storage | Storage capacity. | |
| Points / hour | Points per hour for extension. | |
| Bottom of screen | Start Time | Server launch time. |
| End Time | Current scheduled end time. | |
| New End Time | Extended scheduled end time. | |
| Time Extended (Displayed by entering New End Time) | Extended usage time. Automatically displayed after entering New End Time. | |
| Balance(Currently Available Points) | Current point balance. | |
| Points Required for Change | Number of points required for the extension. | |
| Points after Change(Balance) | User group balance after points are consumed. |
- Enter the new scheduled end time in the 「New End Time」 field.
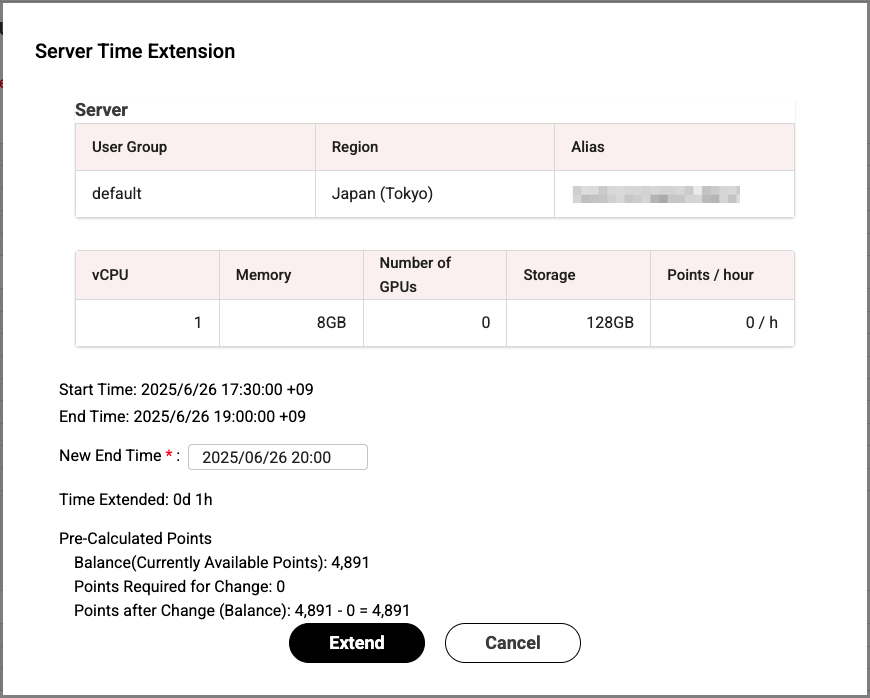
- Confirm the content and, if you wish to execute the extension, click the [Extend] button.
TIPS!
By entering the 「New End Time」, the extended time, required points, and point balance will be automatically calculated and displayed.
- The 【Final Confirmation: Extension of Server Using Time】 screen will be displayed.
After confirming the notes, click the [Extend] button again to execute the usage time extension.
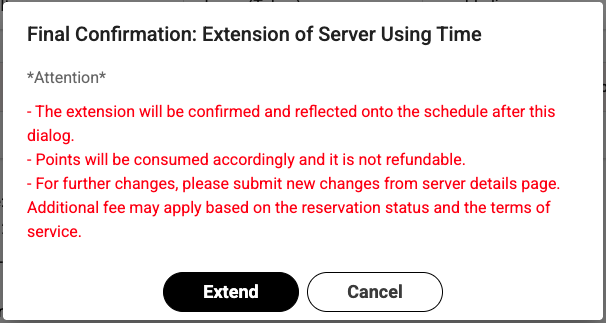
TIPS!
- If the point balance of the user group in question is less than the required number of points when extending the server, the extension will not be possible.
- Extensions may not be possible depending on the reservation status before and after the reserved compute server.
2.7. Termination of Compute Server
This section describes the procedure for terminating the use of a compute server.
Termination operations can only be performed on compute servers whose Status is 「Running」.
Also, the operation can only be performed from the same user group (same user group wallet) that started using it.
- To terminate the use of a compute server, open the 【Cloud Servers】 screen from the left menu.
TIPS!
If the list of calculation servers is not displayed, select the 《Calc Server》 tab at the top of the 【Cloud Servers】 screen.
Selecting the compute server you wish to terminate from the list displays the details screen.
Confirm the content and, if you wish to terminate the server’s use, click the [Terminate] button.
The 【Final Confirmation: Server Termination】 screen will be displayed.
After confirming the notes, click the [Terminate] button again to execute the server termination.
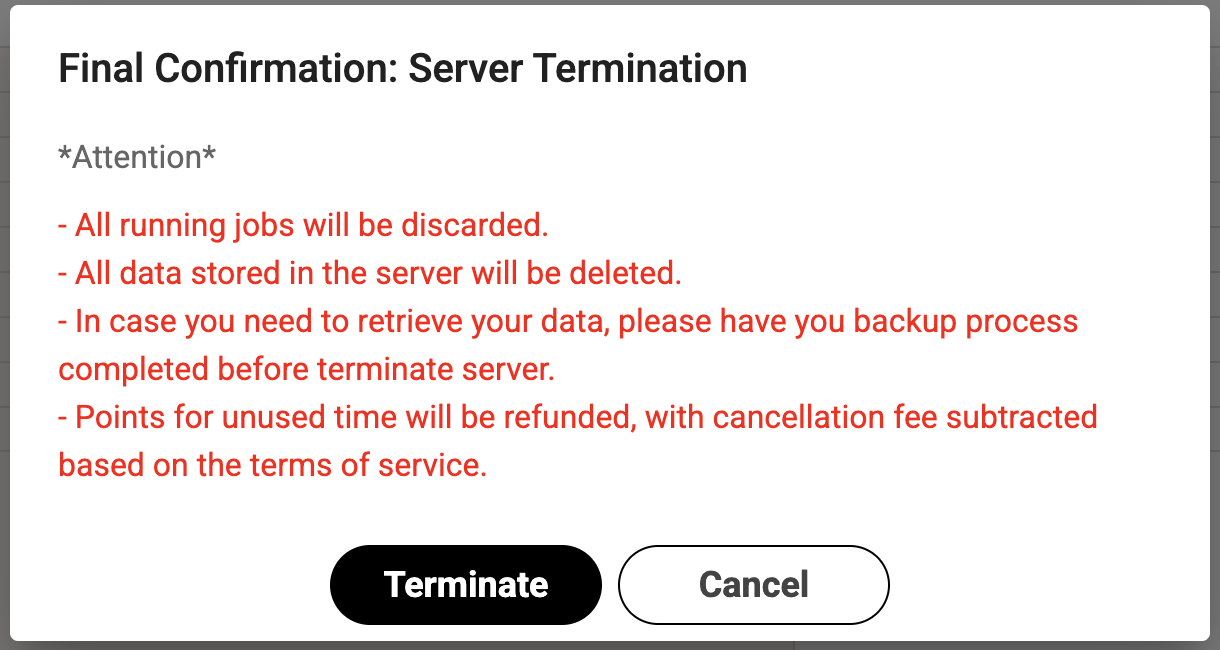
TIPS! When the termination operation is performed, a portion of the points used will be returned based on the return rate according to the compute server’s specifications.
For details, please refer to Point Refunds.
NOTICE!
When the [Terminate] button is clicked, the configuration environment and all stored data for the relevant calculation server will be deleted.
Be sure to confirm in advance whether or not a backup is required.
3. Check Usage Status
In Cloud Bouquet, you can check the usage history and fees for compute servers, including past usage.
This section explains the fee structure related to compute servers and how to check usage history.
3.1. Fee Structure for This Service
First, the fee structure of this service is explained.
The basic fee structure for compute servers is as follows.
- Point Consumption for Compute Server Usage
- The number of points required to use a compute server is calculated based on the defined unit price and usage time.
- The unit price is set per hour and can be checked on the compute server reservation screen, usage history screen, etc.
- Usage time is calculated based on the time from the 「scheduled start time specified at reservation」 to the 「scheduled end time specified at reservation」.
- The number of points consumed can be confirmed during the reservation process.
- Usage time is counted as 1 hour for every 3600 seconds, with fractions rounded up. (Example: 1 to 3600 seconds is counted as 1 hour, and 3601 to 7200 seconds is counted as 2 hours.)
- When the scheduled start time is reached, the launch process for the compute server begins, and it becomes usable approximately 5-15 minutes later.
- It may take approximately another 2 minutes for the status to switch to 「Running」 on Cloud Bouquet after it becomes usable.
For operating conditions, please refer to About Points and Wallets.
- About Storage Servers
- Storage servers can be installed individually upon customer request. For specifications and usage methods, please contact us.(Cloud Bouquet Contact)
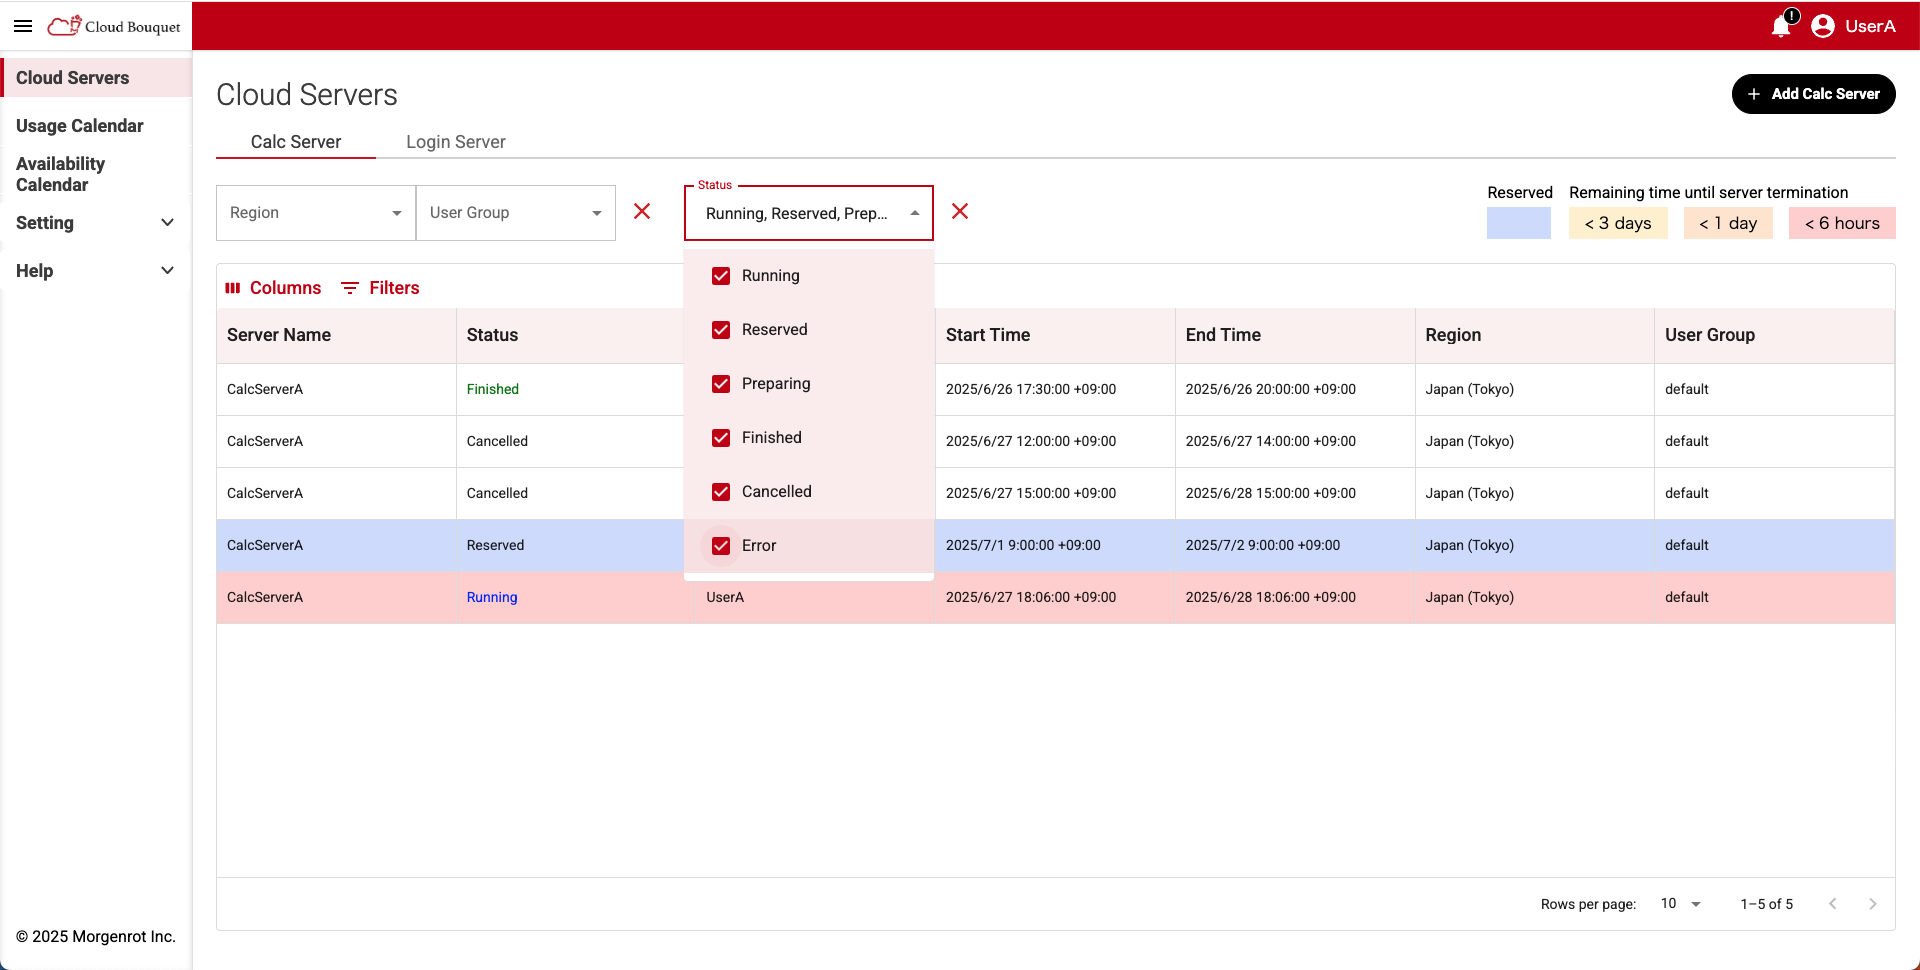
3.2. Checking the Usage Status for Compute Server
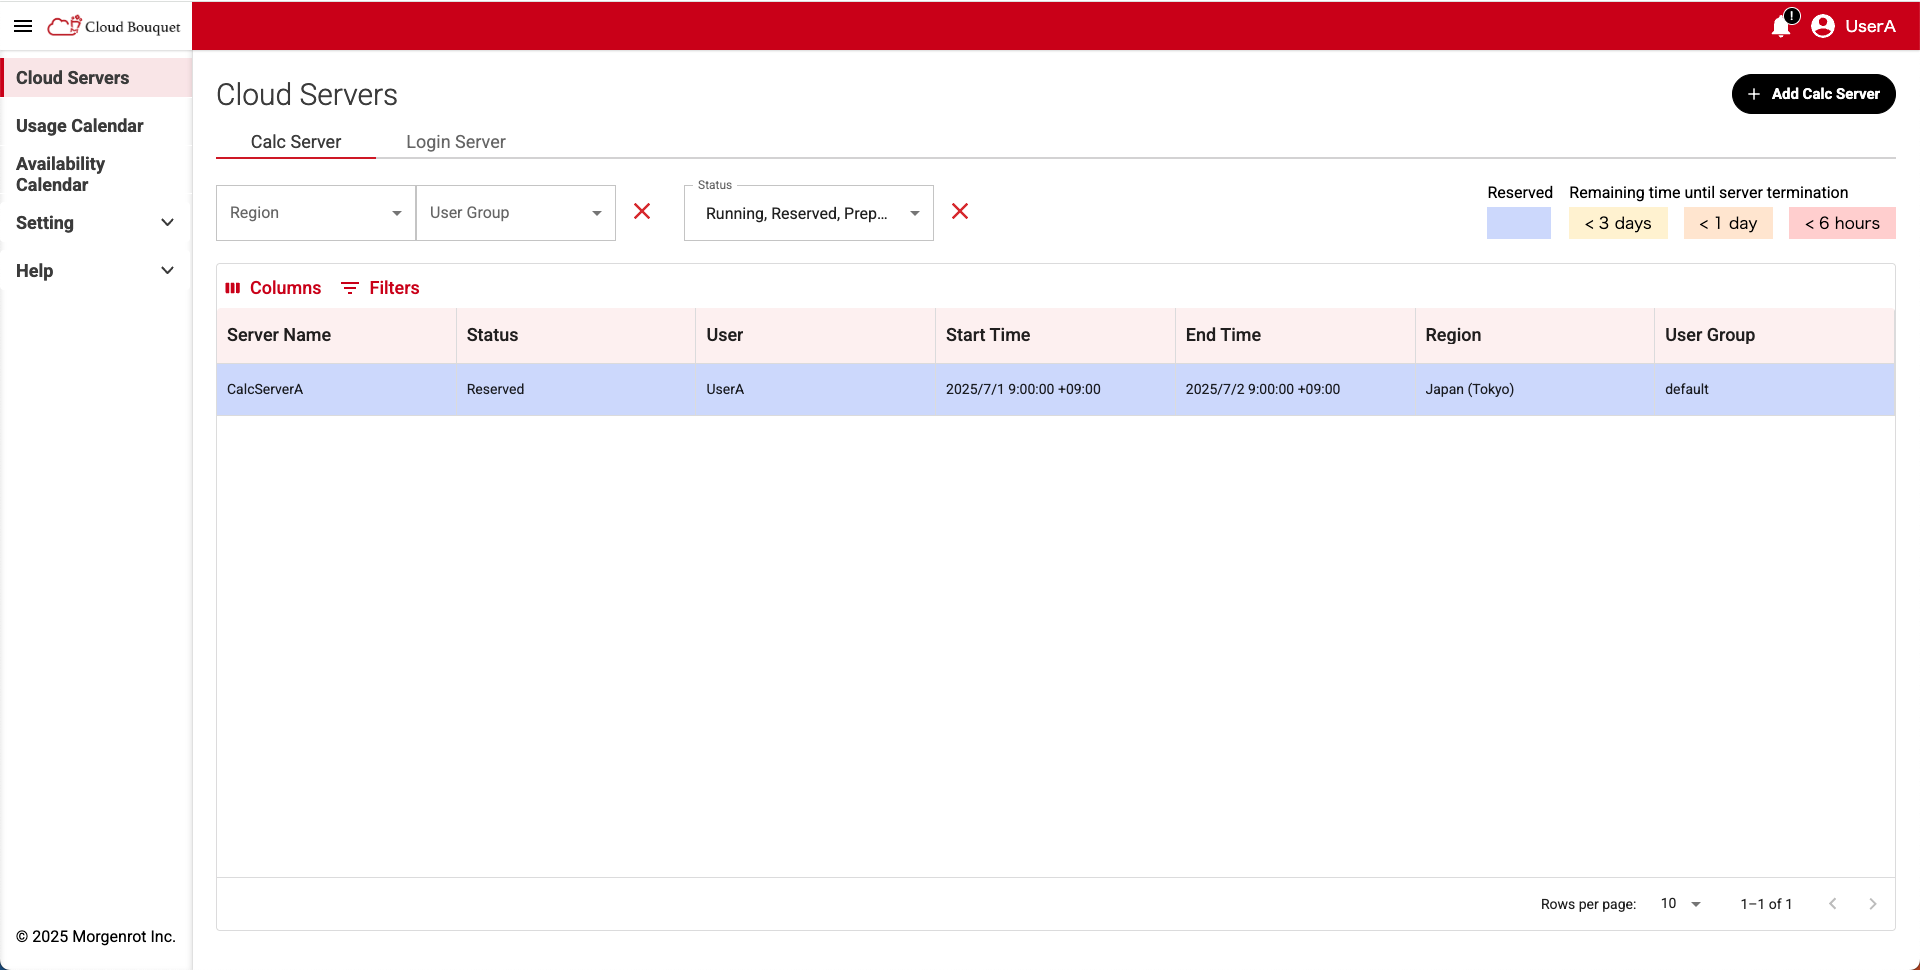
In Cloud Bouquet, you can check the usage status (history) of each compute server.
This information can be viewed on the 【Cloud Servers】 screen.
TIPS!
If the list of compute servers is not displayed, select the 《Calc Server》 tab at the top of the screen.
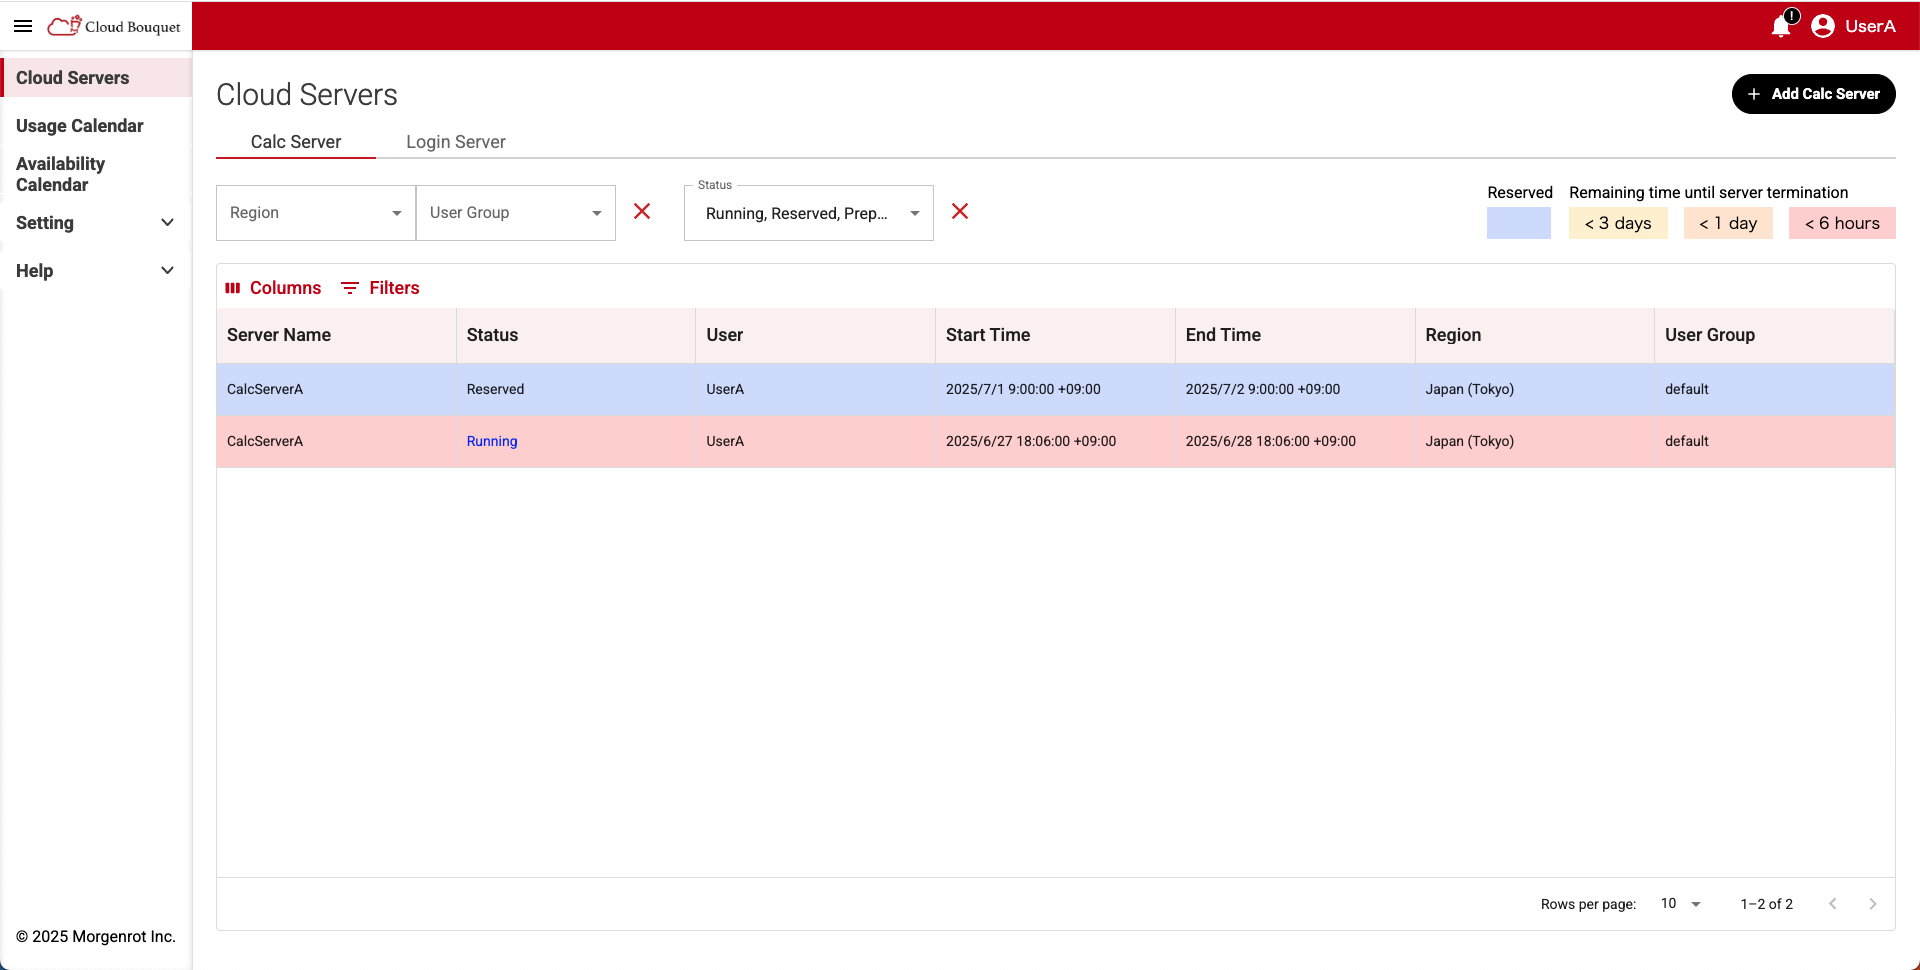
The items shown are as follows:
| Item | Description |
|---|---|
| Server Name | Name of the compute server. |
| Status | Operational status. Reserved / Cancelled / Running / Preparing / Finished / Error |
| User | User who launched the compute server. |
| Start Time | Scheduled start time. |
| End Time | Scheduled end time. |
| Region | Name of the assigned region. |
| User Group | Name of the user group with usage rights. |
Some items are hidden by default on the 【Cloud Servers】 screen. If they are not displayed, enable them from the 〈Columns〉 menu.
| Hidden Item | Description |
|---|---|
| vCPU | Number of CPUs. |
| Memory | Memory capacity. |
| Storage | Storage capacity. |
| GPU | Name of the installed GPU. |
| Number of GPUs | Number of GPUs installed. |
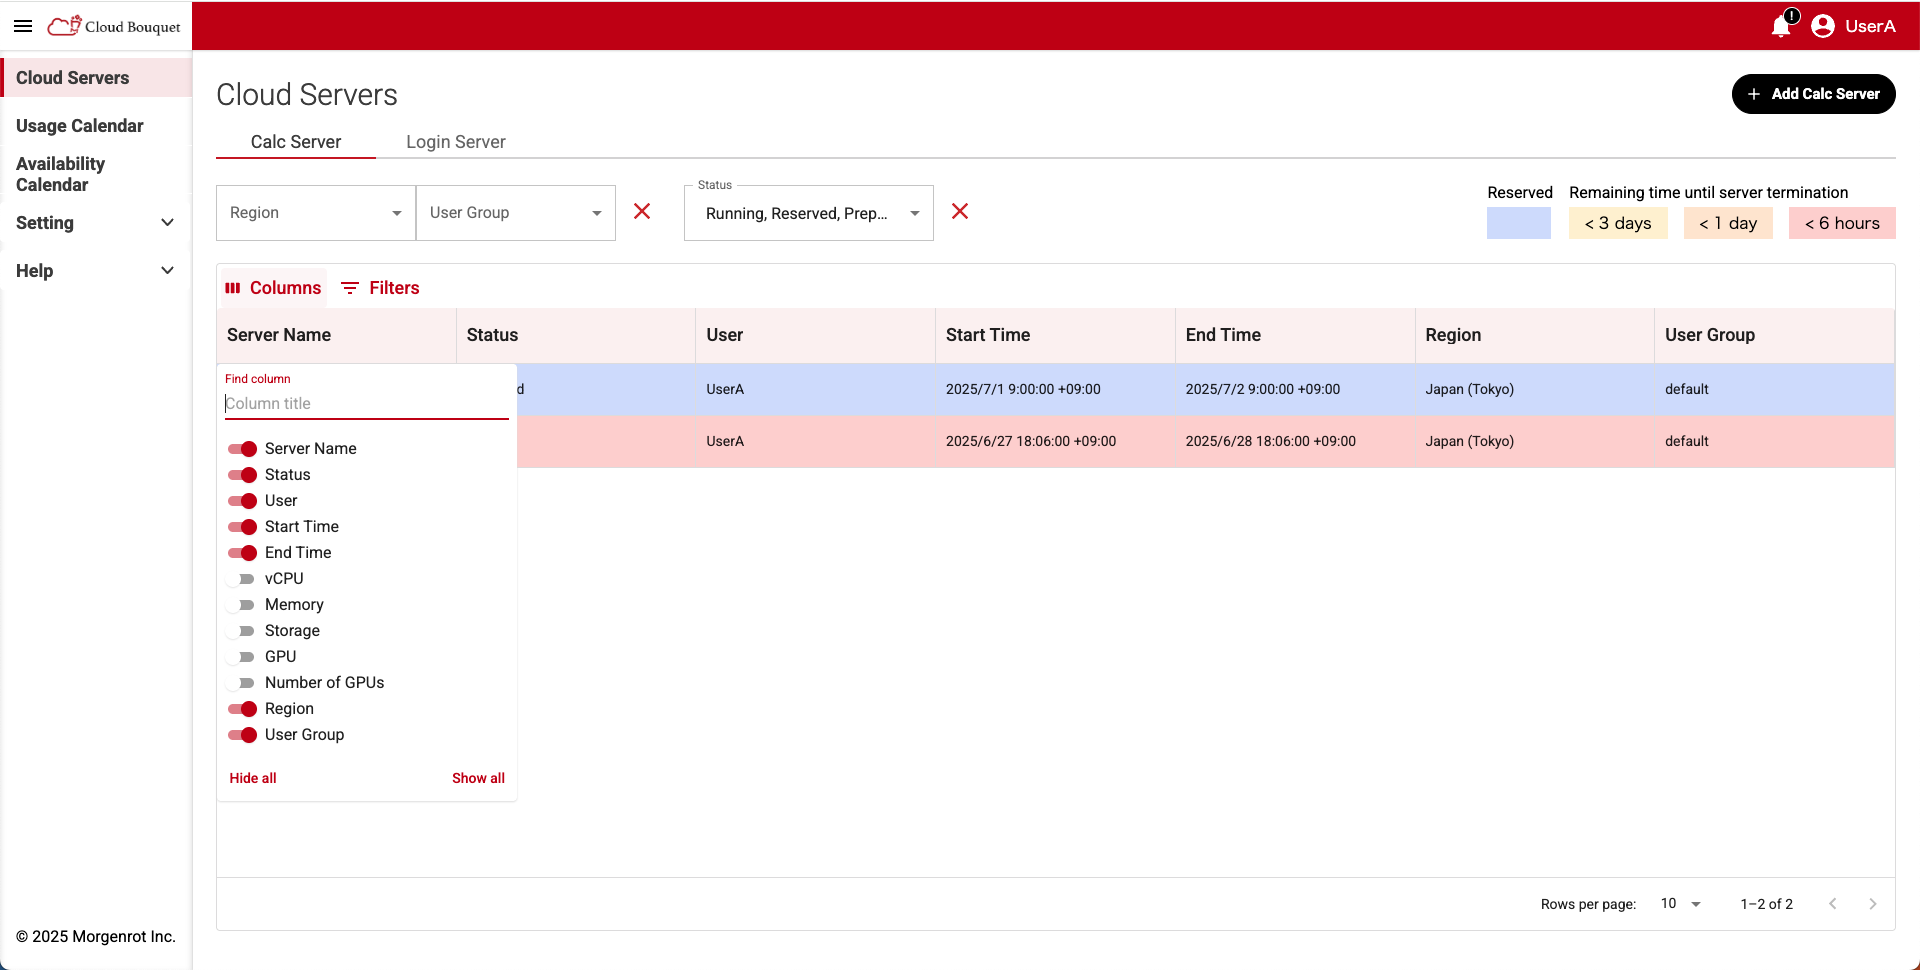
The 〈Filters〉 menu allows filtering data based on matches to any table item.
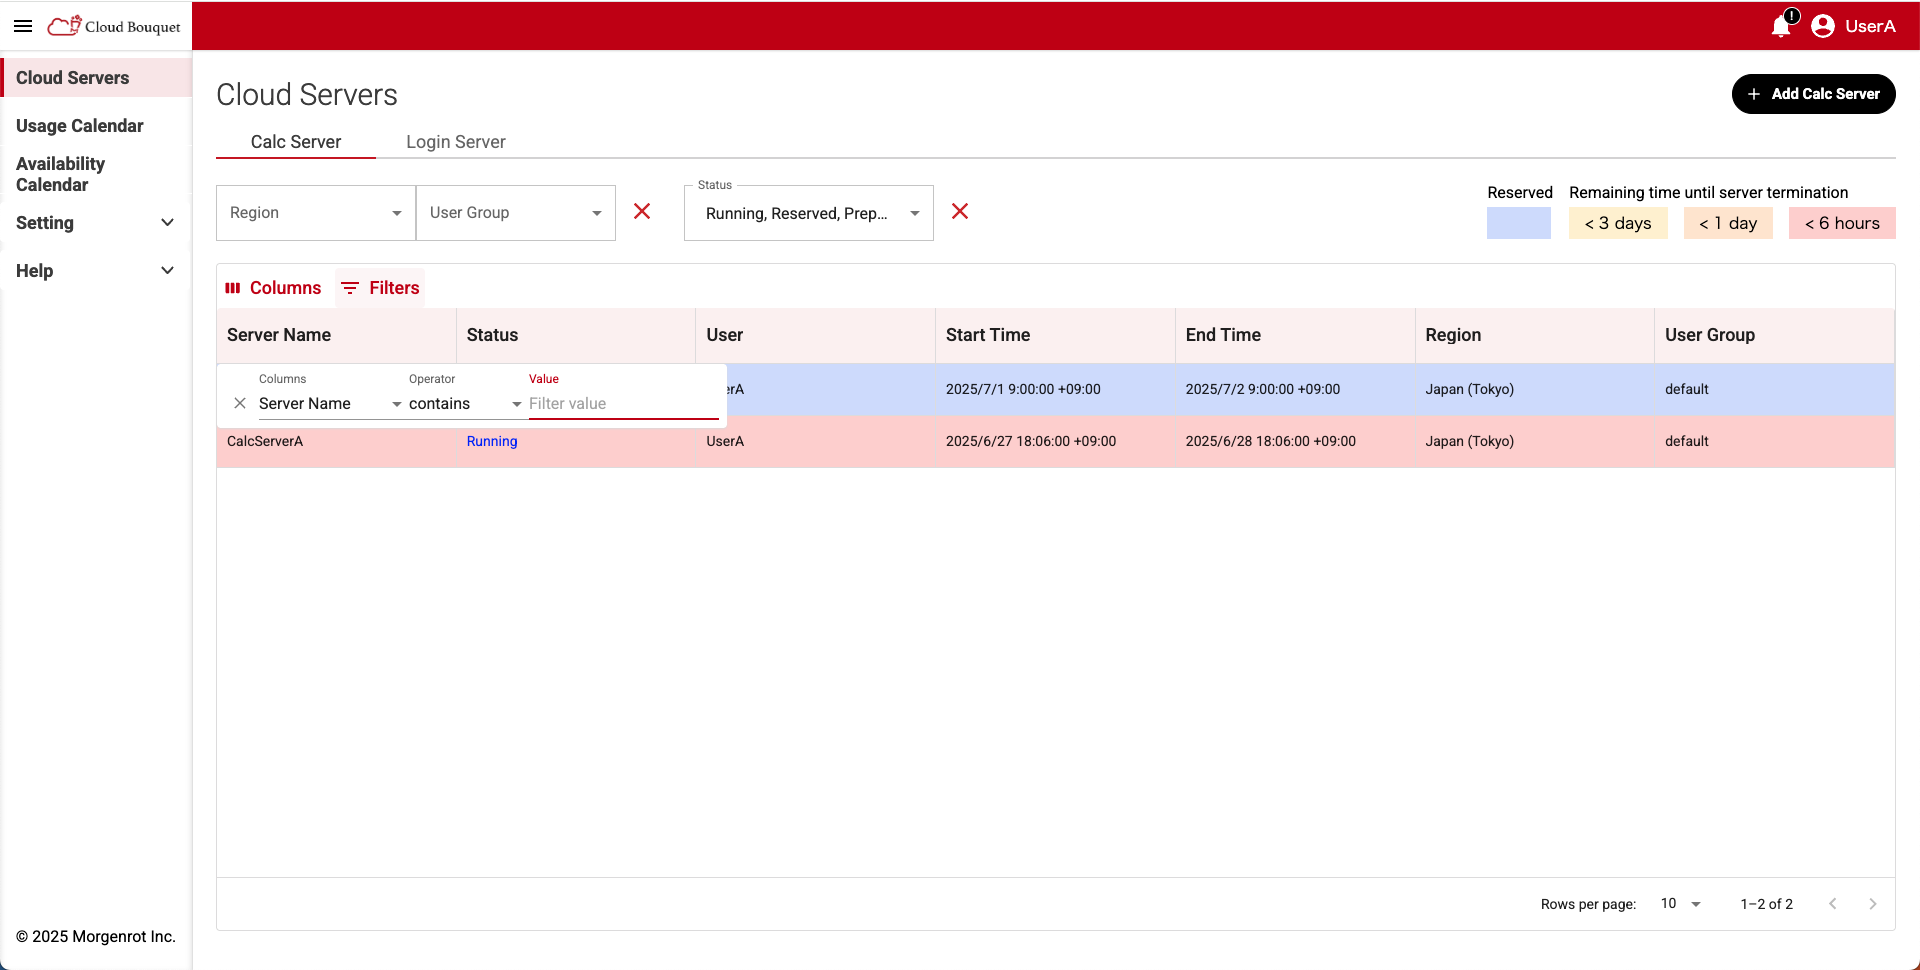
For Reserved and Running servers, they are color-coded as follows:
| Color | Status | Description |
|---|---|---|
| Blue | Reserved | Reserved. |
| Red | Running | Less than 6 hours remaining. |
| Orange | Running | Remaining time is 6 hours or more but less than 24 hours. |
| Yellow | Running | Remaining time is 24 hours or more but less than 72 hours. |
TIPS!
In the initial state of the 【Cloud Servers】 screen, only information for Reserved, Running, and Preparing is displayed.
To display all server information including Cancelled, Finished, and Error, turn ON the display check for each status in the 〈Status〉 menu.
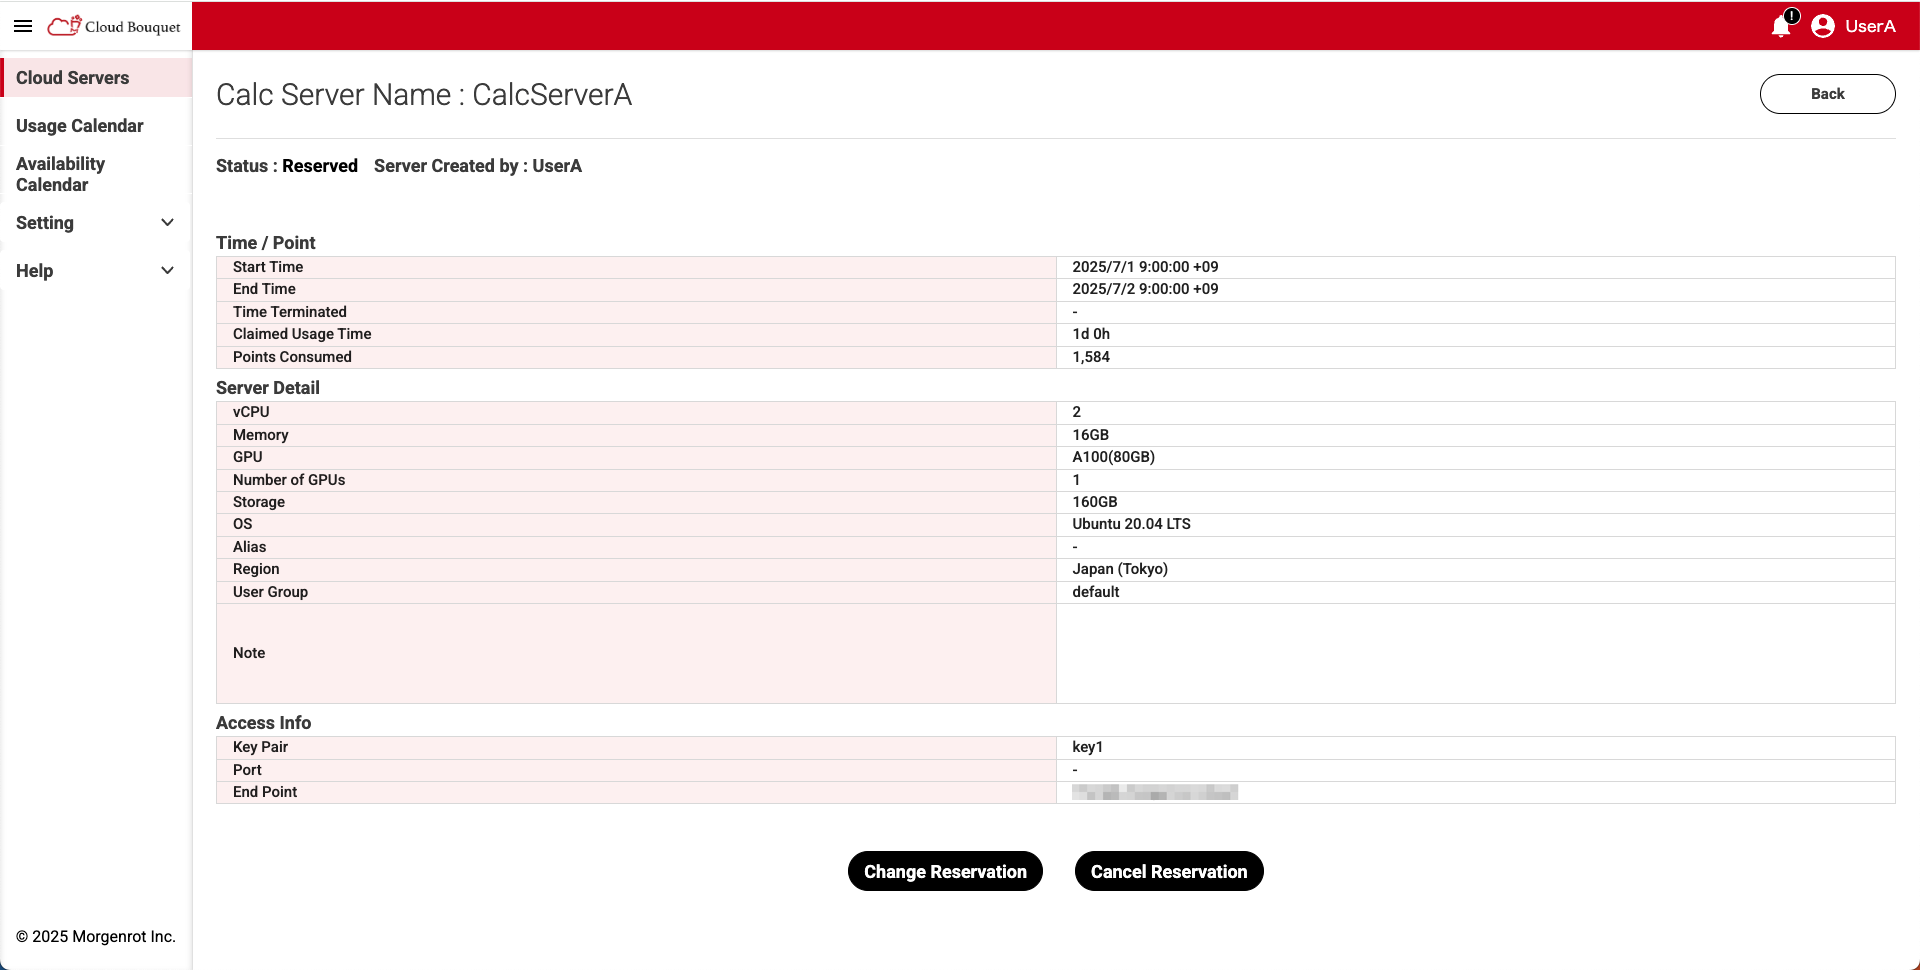
Select the server you want to check from the list to see detailed information.
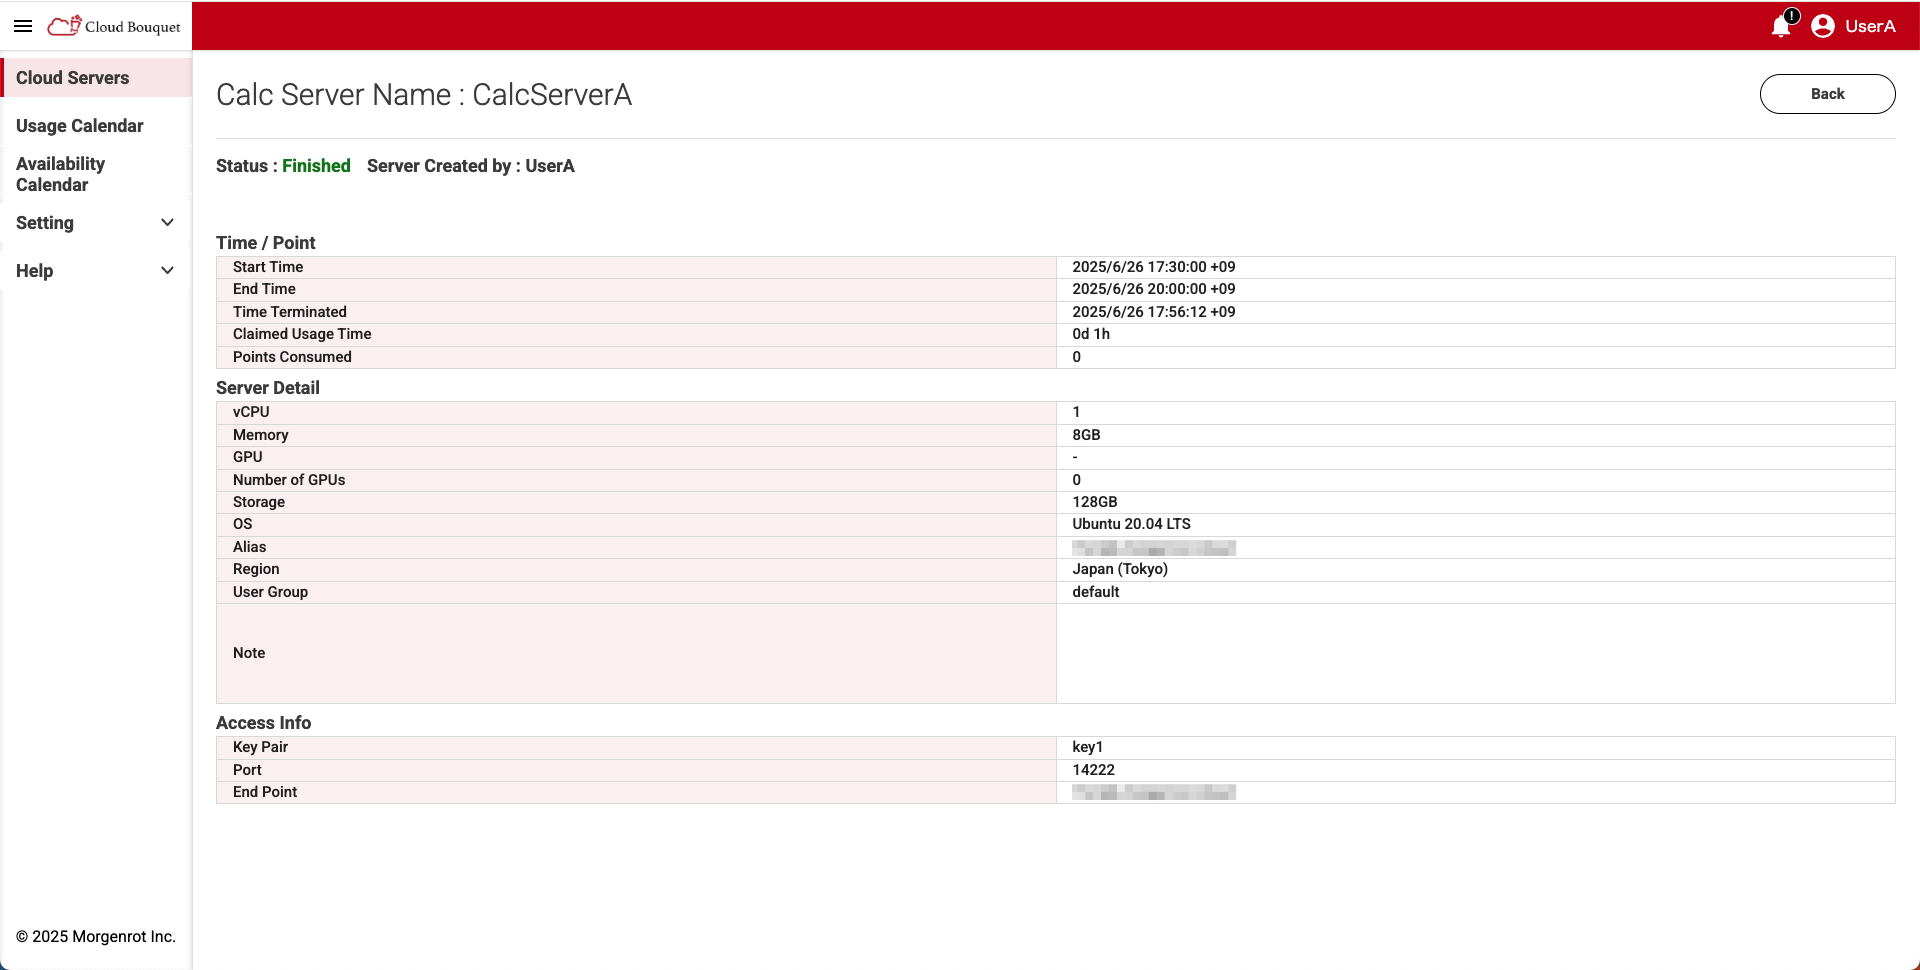
The information displayed is as follows:
| Location | Item | Description |
|---|---|---|
| Top of screen | Server Name | Name of the compute server. |
| Status | Operational status. Reserved / Cancelled / Running / Preparing / Finished / Error | |
| Server Created by | User who launched the server. | |
| Time / Point | Start Time | Scheduled start time. |
| End Time | Scheduled end time. | |
| Time Terminated | Actual termination time. Displayed after termination. | |
| Claimed Usage Time | Usage time.(in hours) | |
| Points Consumed | Number of points consumed. | |
| Server Details | vCPU | Number of CPUs. |
| Memory | Memory capacity. | |
| GPU | Name of installed GPU. | |
| Number of GPUs | Number of GPUs installed. | |
| Storage | Storage capacity. | |
| OS | OS name. | |
| Alias | Alias name. | |
| Region | Region name. | |
| User Group | Name of the user group to which it belongs. | |
| Notes | Notes written at the time of reservation. | |
| Access Info | Key Pair | Associated key pair. |
| Port | Port number. | |
| End Point | End Point. |
4. Confirmation of Notices
4.1. Notification by Notification Screen
In Cloud Bouquet, you can check notifications such as system updates, fault information, and maintenance as 「Announcements」 from the bell icon in the upper right corner of the screen.
- If there is a notification, a 「!」 mark will appear on the bell icon. Clicking it will open a list of announcements.
- The announcement list displays the notification date/time and title. To confirm the content, click the corresponding title.
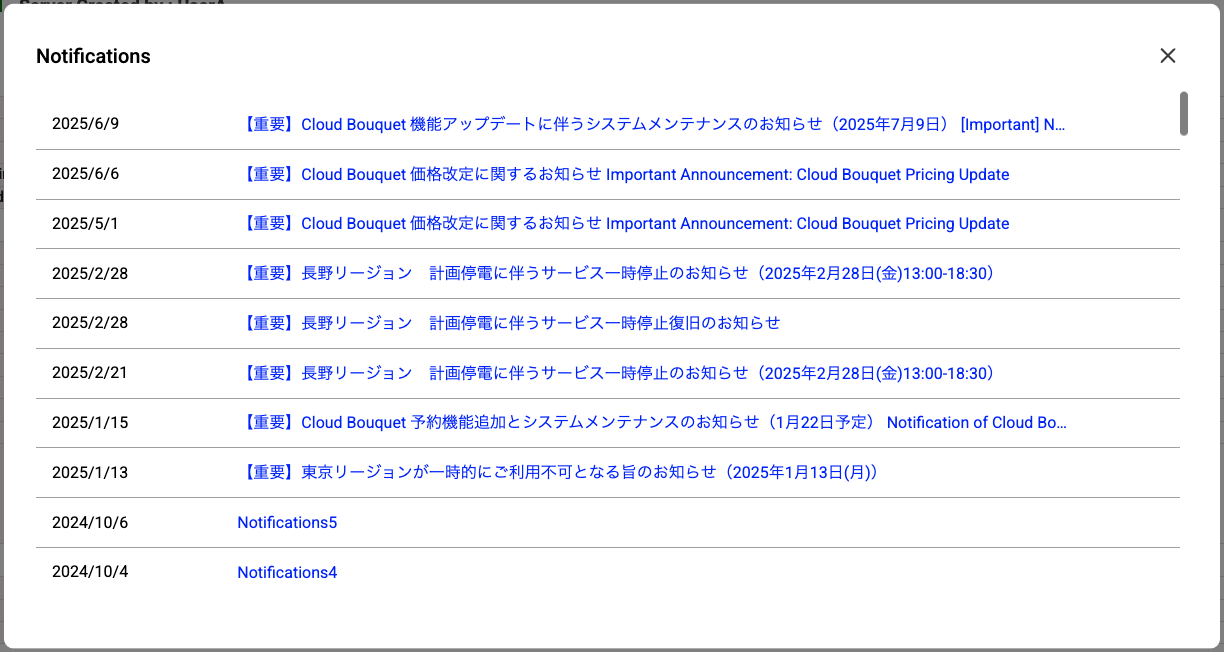
- Clicking the notification title displays the detailed content.
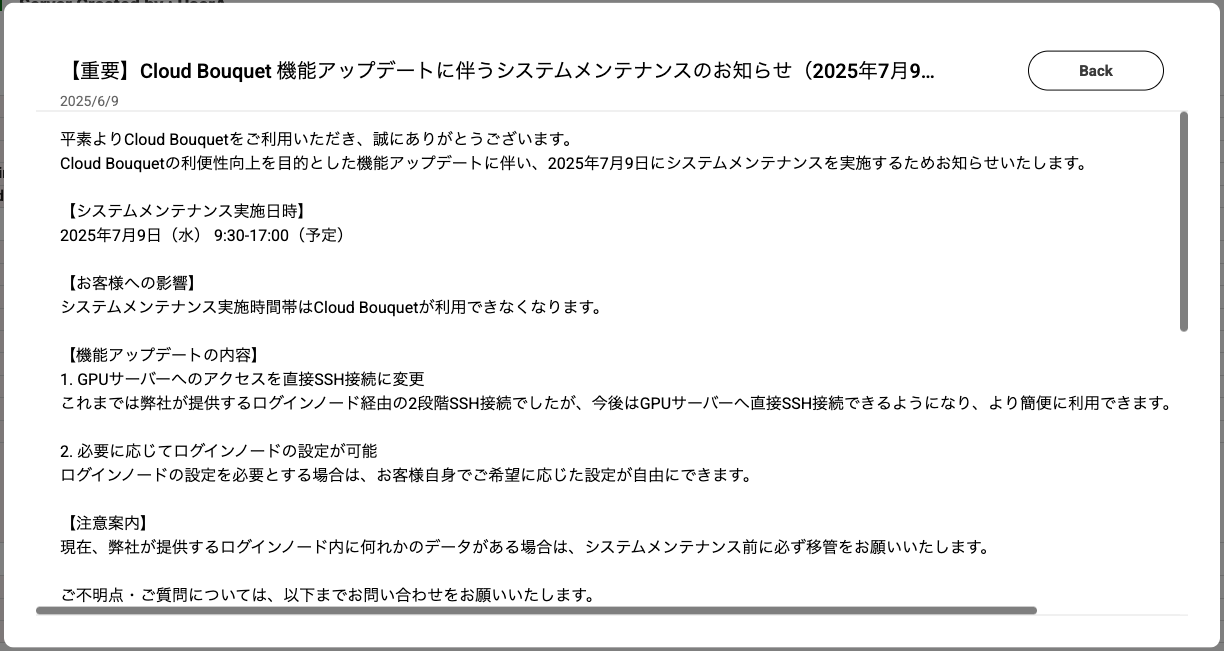
TIPS!
Notifications will include information about system maintenance and updates, information about outages and recovery, and information about the server. Please check the contents of the notifications as they are related to your use of the system.
4.2. Notification by e-mail
In Cloud Bouquet, email notifications are sent at specific timings.
The notification content and sending timings are as follows.
| Content of Notification | Subject | Notification Timing |
|---|---|---|
| Confirmation of the scheduled start time of use of the reservation compute server | Reserved users | 1h/6h/1d/3d before the scheduled start of use. |
| Completion of the reserved compute server startup process | Reserved users | After the start up process is complete. |
| Confirmation of the scheduled end time of the compute server to be used | Reserved users | 1h/6h/1d/3d before scheduled end time. |
| Deletion process of compute server in use completed | Reserved users | After the deletion process is complete. |
| Confirmation of point expiration | administrator | 7d/30d before point expiration. |
| Expiration of points | administrator | After points expire. |
This concludes the guide on how to use compute servers (for administrators and users).